NC35 carb change
Forum rules
Please can you post items for sale or wanted in the correct For Sale section. Items / bikes for sale here will be removed without warning. Reasons for this are in the FAQ. Thanks
Please can you post items for sale or wanted in the correct For Sale section. Items / bikes for sale here will be removed without warning. Reasons for this are in the FAQ. Thanks
-
speedy231278

- NWAA Supporter

- Posts: 1549
- Joined: Tue Jul 03, 2012 11:58 am
- Bike owned: RVF400, TZR125, ZXR750R
NC35 carb change
Having spent months if not year reading and re-reading the stuff here about carb setup, I've finally decided to take the plunge and swap out the carbs on my NC35 for the spare set I have. Quite chuffed that after initial inspection they seem very tidy, the diaphragms are in perfect nick, and considering that there are two sets on eBay for £150 and £300 (and the latter has one broken!!) I think £25 was a bit of a result!
Anyway, rather than hijack one of the other threads, can I please ask some silly questions here? Unless someone tells me I'm being stupid my plan for the setup is pretty simple, everything as nature intended, except I'll be using 112s all round. The bike is utterly stock from the throttle grip to the collector box, and has a straight through Scorpion end can in place of the Honda item. It runs a little crappy at present, which my long time and now retired local spanner man told me was wear in the carb bodies causing minor air leaks around the butterfly pivots. I was reliably informed that these are an interference fit, so if they're worn, there's no way of sorting this short of replacement. The bike has a mere 118000kms on it, so it's fair to say they've had their fair share of opening! Not sure it this distance might have a bearing on the setup?
My first proper question is how to determine the position of the pilot screws. I can count to 1 5/8ths, however I was wondering on how exactly you determine when it's fully 'in'? Clearly the spring gets compressed, but can you go too far and damage the spring? When taking them out for inspection, they seemed a lot further out than 1 5/8ths, but the carbs had 108s in and no sign of anything out of the ordinary so I would assume the previous use was in stock form. Do I keep going until they really won't go any more, or is there a particular feel to the effort required that says to experienced people that they've gone as far as necessary? Also, I was reading about fine tuning of the settings, and it was suggested that you screw them out until just before the bike's idle speed starts picking up. I'll probably go back and re-read that to make sure I read it right, but another thing that has me wondering is how this works in relation to the overall idle adjuster that sits by the choke? Should I ignore that until the screws are set and the carbs are balanced, or will it need adjusting at the same time as well? if so, which first?
The other question is in relation to setting the float height. I've seen the articles about the business card template, but I'm still a little confused as to the method. I'm sure it will become obvious when I have the bits in my hands, but are there any pics anywhere than can help? I do have the Haynes manual, but currently it's miles away and I don't remember reading that part despite always thumbing through when I'm bored!
I've seen arguments for and against Rick O's springs. I'm not after track performance, just nice smooth power, maybe a bit more if I'm lucky, and hopefully a few more mpg. It was said somewhere that the springs weren't worth bothering with unless you're race kitting everything else, and I'm certainly not doing that!
Finally, there are numerous listings for 112s on eBay (some list as 112.5, and I distinctly remember someone suggesting that 112.5 was what you get for that size anyway), however I'm not sure which ones to go for. If they are listed as Keihin 112 M5 main jets that are stubby and slot headed like the ones currently fitted, is it safe to assume they are the correct fitment? There's one company on eBay selling them for all sorts of four-stroke scooters at 2.99 a throw, and another at 3.99. The former list them as KMJ-M5-112 and the latter with the Keihin part number 99103-393 #112. I assume that the former is simply for Keihin main jet M5 thread 112 size, but as I've assumed in the past and come to regret it, I thought I'd rather ask a stupid question than make a stupid purchase!
-
Cammo
- Site Supporter

- Posts: 4505
- Joined: Thu May 01, 2008 12:35 am
- Bike owned: NC30
- Location: Melbourne, Australia
Re: NC35 carb change
Just wind them in until they're nipped up slightly, you don't need to put any force on them. Count 1 & 5/8 turns out, it's more important that they're all set more or less evenly than exactly this amount of turns. The standard setting might not work best for you with the aftermarket muffler, but start from there and see how it goes.speedy231278 wrote:My first proper question is how to determine the position of the pilot screws.
The float needs to just be resting on the spring loaded tip of the needle valve, it does indeed make more sense when you try this for yourself! The carbs need to be held at about a 45 degree angle for them to rest this way, you'll work it out.speedy231278 wrote:The other question is in relation to setting the float height. I've seen the articles about the business card template, but I'm still a little confused as to the method. I'm sure it will become obvious when I have the bits in my hands, but are there any pics anywhere than can help?
I've used Rick's springs in my roadbike with rvf carbs, they worked well. See how it goes without them first after a carb strip and clean, you may not feel that you need them.speedy231278 wrote:I've seen arguments for and against Rick O's springs. I'm not after track performance, just nice smooth power, maybe a bit more if I'm lucky, and hopefully a few more mpg. It was said somewhere that the springs weren't worth bothering with unless you're race kitting everything else, and I'm certainly not doing that!
112's would be the recommended size for your setup. I think it's important to buy genuine keihin jets, we've seen on the forums that many other brands don't correlate exactly to the keihin sizes, which means essentially you'll be fitting bigger/smaller jets without knowing it. Some sellers on ebay list the keihin part number in their listing but will actually be selling you non-keihin jets. Buyer beware, ask if genuine first - genuine jets have the keihin 'K' symbol stamped on them (and don't come in .5 increment sizes).speedy231278 wrote:Finally, there are numerous listings for 112s on eBay
It would be worthwhile to inspect and clean the carbs before fitting them. Check out this V4 carb jetting guide document, it covers nc30 carb cleaning and rejetting, but the basics are the same for the rvf carbs (except jet sizes and settings, gaskets etc): http://www.400greybike.com/docs.htm
I've been meaning to get around to doing a similar jetting guide for rvf carbs, with any luck I'll get around to it soon.
All good questions mate, you won't know unless you ask!
"It's just a ride" Bill Hicks
-
speedy231278
- NWAA Supporter
- Posts: 1549
- Joined: Tue Jul 03, 2012 11:58 am
- Bike owned: RVF400, TZR125, ZXR750R
Re: NC35 carb change
Yes, everything's getting a good clean - I just spent a small fortune on an ultrasonic cleaner. The last time my friendly mechanic did a strip and balance the carbs on the bike at present were done ultrasonically as he wanted to play with his new toy, and the difference was ridiculous. Granted, new plugs, filter and a good balance ought to have made a difference anyway, but it never did that much before!
The reason for looking on eBay for the mains is that DSS want £6.87 each for them, and added to fours sets of seals and a set of o-rings for the fuel tubes, that's starting to get very expensive! having said that, CMSNL want a similar figure when coverted from Euros, so I suppose they aren't too far off the mark. I'm not going to reuse the seals in the carbs, they've gone really hard and are surrounded by fuel residue as I've had them years. I'd rather not risk becoming a rolling fireball!
While I've been typing this, one seller has confirmed that their Keihin jets are genuine parts, albeit early 1980s 'new old' stock. Is that likely to be an issue? I have asked the seller, however I don't know if they'll know the answer, or might even just say they're fine just to get a sale. I did see some feedback from someone complaining that the jets weren't geniune, but the seller explained that the age was the reason. I'm not a Keihin carb historian, so I have no idea if that's right or not!
Edit: seller says they'll be fine, it's these I'm looking at: http://www.ebay.co.uk/itm/Keihin-FCR-CV ... 3cc1ee417b so if anyone thinks I'm barking up th ewrong tree please say now!
If I can be bothered, I'll drag my camera back home when I do the cleaning for some before, during and after pics of the work. If when I stick everything back together and the bike runs like a pile of poo, how do I tell the difference between the pilot screws being set wrong, the jets not being right, or anything inbetween?
-
Cammo
- Site Supporter
- Posts: 4505
- Joined: Thu May 01, 2008 12:35 am
- Bike owned: NC30
- Location: Melbourne, Australia
Re: NC35 carb change
That's about the going rate for genuine keihin jets, you could always try a wanted ad in the classifieds. I can't comment on the ebay jets.
Pay attention to what parts go where, the emulsion tubes for example are different for front and rear carbs (needles also? Can't remember sorry).
Are you planning to clean the carb bodies in the ultrasonic tank? Only asking as if you need to split the carbs into 4 to fit them in a small sized tank then this is where something will go wrong if anywhere at all. It's a fairly difficult job getting them back together and they'll need to be balanced afterwards.
Wait and see if that happens before worrying! There's no reason it will run poorly at all if everything's put back together properly and the settings are close. Then you can fine tune from there.speedy231278 wrote:If when I stick everything back together and the bike runs like a pile of poo, how do I tell the difference between the pilot screws being set wrong, the jets not being right, or anything inbetween?
Pay attention to what parts go where, the emulsion tubes for example are different for front and rear carbs (needles also? Can't remember sorry).
Are you planning to clean the carb bodies in the ultrasonic tank? Only asking as if you need to split the carbs into 4 to fit them in a small sized tank then this is where something will go wrong if anywhere at all. It's a fairly difficult job getting them back together and they'll need to be balanced afterwards.
"It's just a ride" Bill Hicks
-
speedy231278
- NWAA Supporter
- Posts: 1549
- Joined: Tue Jul 03, 2012 11:58 am
- Bike owned: RVF400, TZR125, ZXR750R
Re: NC35 carb change
Yes, I'll be splitting them up. And yes, it does look quite complicated to get them back in one piece, however as this is a spare set, there's no rush to get them back on the bike. I figure that if I take one off at a time, I can't get too confused, and being new to the bike as well they'd need balancing regardless. In any case, it's a good learning experience :-) I'm also considering doing the valves at the same time, it's nearly due, and as I don't have my friendly mechanic to do it at mate's rates I'd be looking at frightening money. However, having all the gasket sets, o-rings, jets and rocker cover gaskets in my basket at DSS and them adding up to £180 isn't exactly pretty! lol
-
GFRacingUK
- Site Supporter
- Posts: 54
- Joined: Fri Sep 05, 2008 4:01 pm
- Location: Halifax, West Yorkshire
- Contact:
NC35 carb change
I've just been through the same procedure. I'd be very wary about taking the carbs apart completely. I cleaned mine in an ultrasonic tank by removing the float bowls, and the top inlet tray and trumpets then immersing all 4 bodies in the solution and turning them every 30 mins.
You will find them almost impossible to get back together once they are split, so I'm told!
You will find them almost impossible to get back together once they are split, so I'm told!
GF Racing UK - New & Used Parts CBR400 NC23/NC29/VFR & RVF400 NC30/ NC35
Contact: Dan Marsden or Graeme France
http://www.gfracinguk.com
sales@gfracinguk.com
Tel: 01652 650142 -
Ext 1 for Parts - Dan
Ext 2 for Workshop - Graeme
Contact: Dan Marsden or Graeme France
http://www.gfracinguk.com
sales@gfracinguk.com
Tel: 01652 650142 -
Ext 1 for Parts - Dan
Ext 2 for Workshop - Graeme
-
speedy231278
- NWAA Supporter
- Posts: 1549
- Joined: Tue Jul 03, 2012 11:58 am
- Bike owned: RVF400, TZR125, ZXR750R
Re: NC35 carb change
I guess I'm a miracle worker then! Weekends plans were mainly ruined however. My bike lives with my parents back in Sussex as I don't have anywhere to keep in in Dorset where I work, so I only get to play with it at odd weekends when I go back to do other things. Irritatingly, the ultrasonic cleaner had turned up, however there was no-one to sign for the carb cleaning solution, and the carrier very usefully only accepts callers at their depot on weekdays. So, I simply started out to take some pics of the carbs to show the differences between the 30 and 35, but ended up pulling the whole lot to bits and putting them back together again. It looks pretty complicated, but to be honest there's no rocket science, although getting the carb balancing springs to go back under the paddles is a bit fiddly! It was rather dark, and even with the light on and using flash my camera wasn't too happy taking closeup pics, however I'll have a go at editing them when I get around to it. One thing I need to do take a pic of the other type of emulsion tube as I only did one. Just need to make sure they were put back in the right carbs when/if the previous user had them apart. While you could obviously mix up the bits from the carbs, all four bodies have differences that mean you can't jumble them up. For starters, the balancing gubbins is different on each, one has the pulley for the throttle cables, and it's opposite number has a flexible grip for a wiring run bolted to it's end of the rod that holds them in place. Also, while the bodies are cast the same, they have different ports opened out for the pipes that go between the pairs, so the only issue you might have is getting the ones that go to the sub air cleaner back to front, or the overflows running out the wrong end. I seem to recall that all these plastic joints are flipping expensive, the last time my carbs were done, it was found that the fuel ones were shot, and I think they were about £30 each!
-
speedy231278
- NWAA Supporter
- Posts: 1549
- Joined: Tue Jul 03, 2012 11:58 am
- Bike owned: RVF400, TZR125, ZXR750R
Re: NC35 carb change
Right, here goes with the first stage.... please note that as I feared some of the pics are pretty crappy, so when I pull the things apart again for cleaning when I've actually got something better than Fairy liquid in the ultrasonic tank I'll make sure I'm set up a bit better for pics! Assuming you already have the carbs off of the bike, you need a selection of medium sized cross-headed screwdrivers (I find that you can always find a slightly better fit than the one you pick up first!) at least one with a fairly thin shaft, a medium sized flat headed screwdriver, a 7mm socket with a fairly thin wall, a 10mm socket, a pair of small pliers and something like a small nail, heavy pin, thin welding rod etc (to push out the float bowl pin). For those like me who didn't know what the numbers were, the carbs (and presumably cylinders) are:
Front left 2 4 right
Rear left 1 3 right
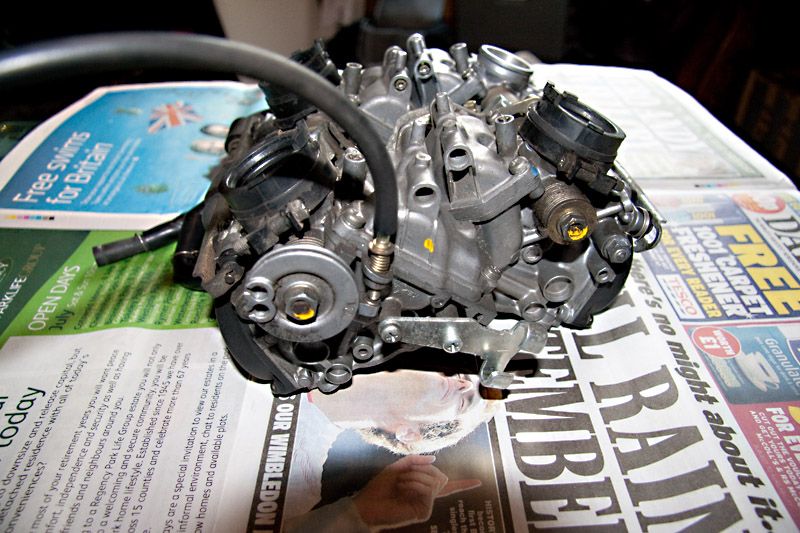
General view of carbs with underside facing up. You are look at the front carbs here, and as they are inverted, it's carb 2 on the left and 4 on the right. Carb 4 is missing it's rubber (or insulator as Honda call it) as this was the one I experimented with in the ultrasonic bath. Despite only having washing up liquid, you can tell the difference already. The carb rubbers go hard over time, and apparently if left with either or both ends off the bike or carbs for any length of time they start going even harder, misshapen and shrink. They are not identical, cyls 1+4 (16211-MR8-900, £6.95) and cyls 2+3 (16221-MR8-900, £4.75) having different ones. Not exactly cheap for a set, and often hard to get hold of.
Side view of carbs 4 and 3. The rubber hose between them is the fuel feed from the tank, and the pipe connected to it that goes to the tank itself can be seen at the right side of the pic. You can also just see one of the pipes that goes to the sub air cleaner element. Please note that the clamp for the carb rubber is NOT in the right orientation if you want to be able to slacken it when the carbs are on the bike as the screw head should be facing the camera, not facing across the shot - I didn't really think about this when I did the thing up! If you lose or break these clamps, they are 16219-MR8-900 and cost a whopping £4.95 each If you've only lost the square nut, it's 16222-MV4-300 (89p), and the 5x28mm bolt is 90023-MM5-000 (1.09). It does not appear that the spacer that goes in the middle can be purchased on it's own, so don't lose it!
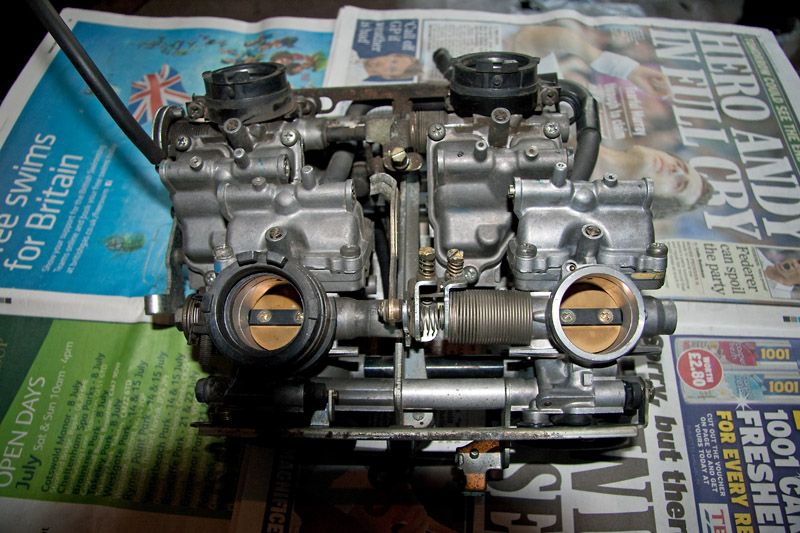
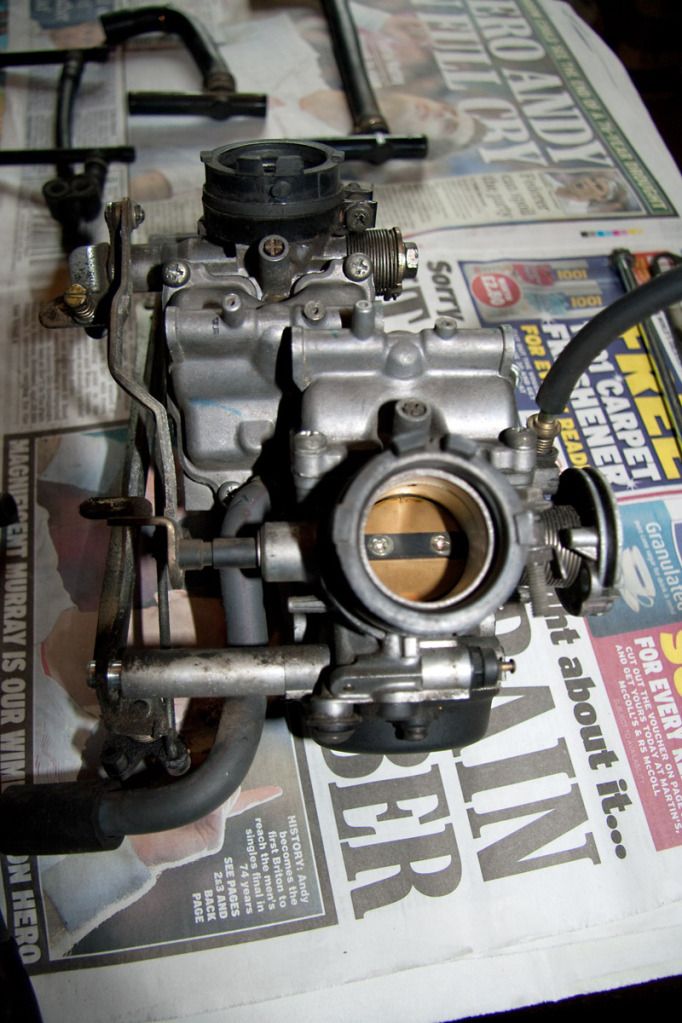
Front view of carbs 1 and 3. As you can see, carb 1 is where the throttle cables and idle adjuster (16029-mr8-900, £23.10) are located. Carb 3 has a wiring loom holder (91410-679-000, £3.46) bolted to it's end of the rod that joins it to carb 1, so don't forget where it came from. Under the fuel pipe mentioned earlier, you can now see both pipes that go to the sub air cleaner, and you can just about make out what I assume are the float bowl overflow pipes by the right of those, under the main fuel pipe. The t-piece you see in the main fuel pipe, like all the others, is eye-wateringly expensive for such a simple piece of plastic, but not as bad as some we'll meet later. It's 16958-MB0-000 at £8.76. All the butterfly clips on the fuel delivery pipe and joints are part 95002-02129, £0.65 each.
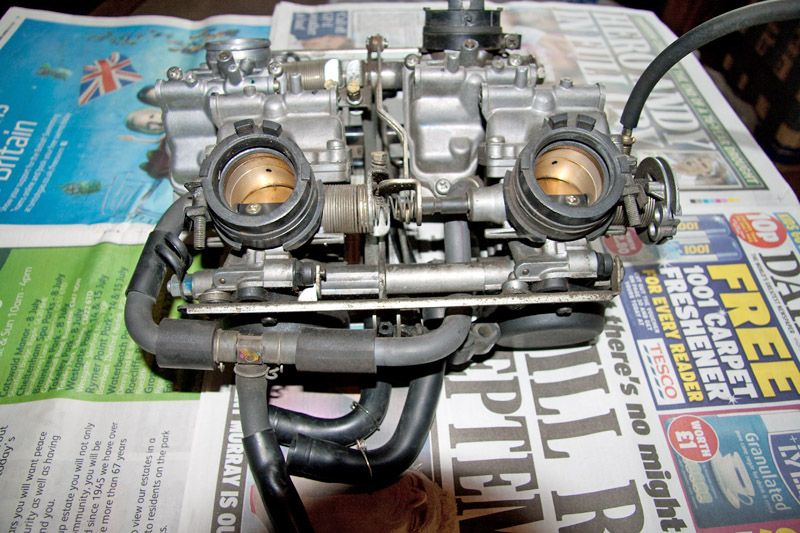
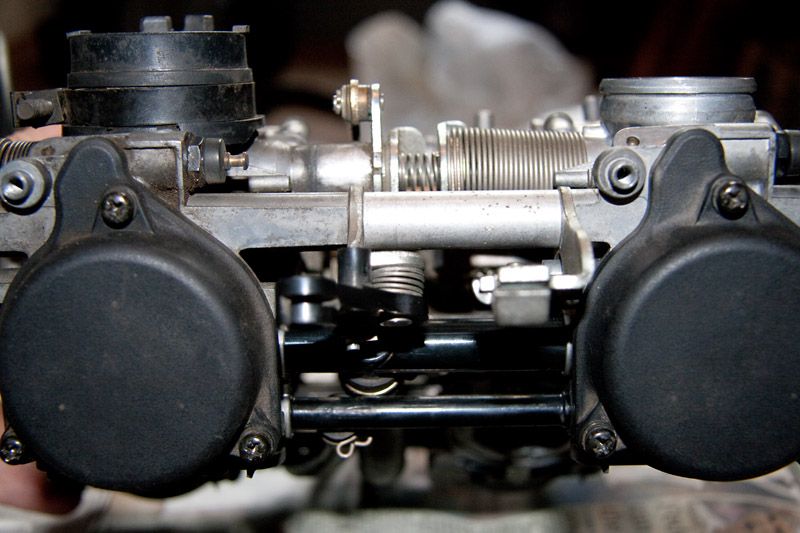
Side view of carbs 1 and 2. Nothing very interesting here, however you can see where the idle adjuster bears against the throttle cable pulley, and also the large silver coloured throttle cable guide (16119-mr8-900, £10.74). Note that the pulley is not available on it's own according to the diagram.

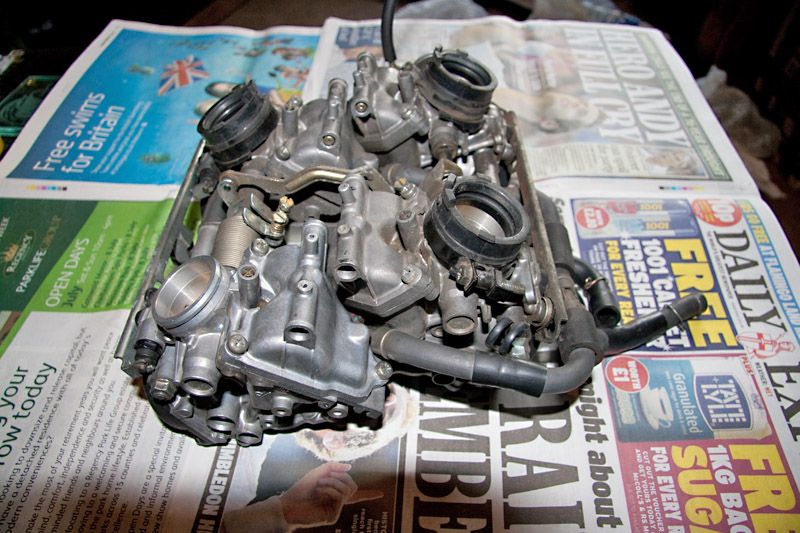
View from the top with the carbs the right way up. The front carbs (2+4) are at the top of the pic, and obviously that means 1+3 are at the bottom. You can see here where the thinner overflow pipes and joiners are located, as well as the thicker ones that go to the sub air cleaner. At the top, the black arm between the carbs is the where the choke cable locates, and the silver bracket is where the choke cable is clamped. In this view, the gaskets that go between the carbs and airbox/velocity stacks (I'm not sure precisely how that lot go together as my carbs came as you see them) are not present.
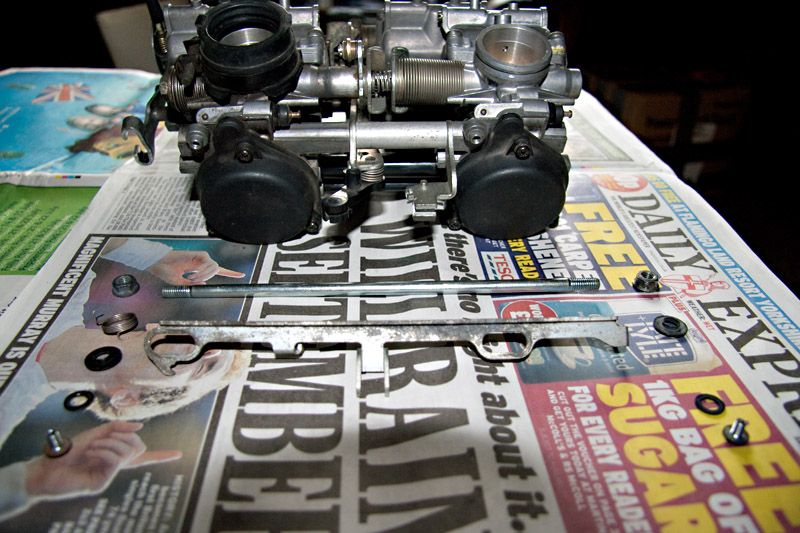
Right, let's start with the demolition.....! Whip out one of your cross headed screwdrivers and remove the two screws holding the choke operating bar on. The front screws and bar tend to be pretty manky as they are right in the path on any crap that finds it's way up behind the top rad. The screws (16081-KAZ-000, £1.07) and washer (16085-MV4-000, £1.11) aren't exactly cheap, but pale into insignificant in comparison to the plastic collars that go behind the bar (16175-MZ1-000, £8.39) and the spring (16051-MZ5-670, EUR11.50), so it would be rather handy no to lose those either! The bar itself, 16121-MR8-900 is a whopping £28.56 if you are unlucky enough to find that it's corroded to death and not suitable for reuse. The joining rod has a 10mm flanged nut on either end (94050-06000, £0.80). Honda describe this as a 6mm nut, so I assume they are referring to the thread size, not the head.
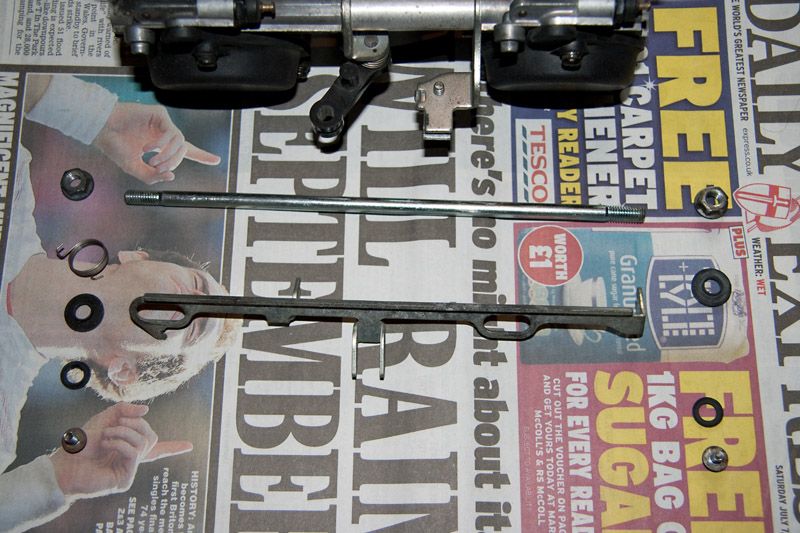
View from above of the same. The carb joining rod is no longer available, however the rest of the parts here add up to over £70 including VAT between them for two nuts, two screws, four plastic washers, a spring and a bit of metal.... expensive parts labels, Honda ones...
A quick look a bit closer before pulling the first carb off. Of interest here is the spacer between the carbs (no longer available) that has the bracket for the choke cable (16119-MZ5-600, £10.16) between it and carb 2. Also, you will see the smaller spring between the two carbs (16053-MB0-671, EUR5.00) which Honda refers to as a thrust spring. It's not too hard to extract before splitting the carbs, and doing so would probably reduce the risk of losing the thing. Also, there is a spring under the carb adjuster point that you need to be careful with. Not the one that the screw screws through, but under the paddle this one presses against, there is another one between that paddle and the one underneath. It will probably stay where it is when the carbs are split, but be very careful it doesn't escape. Fortunately, they can still be found (16052-MV4-000, £2.28), and are a lot cheaper than the adjuster screws and springs (16028-MR8-900, EUR25.5) which are silly money!
Here is carb 4 removed from the group. Note the thrust spring, spacer and choke cable mount. It looks reasonably clean because it's the one that has already had a bath. In order not to lose any of the bits from the choke bar, I temporarily put them back on it.
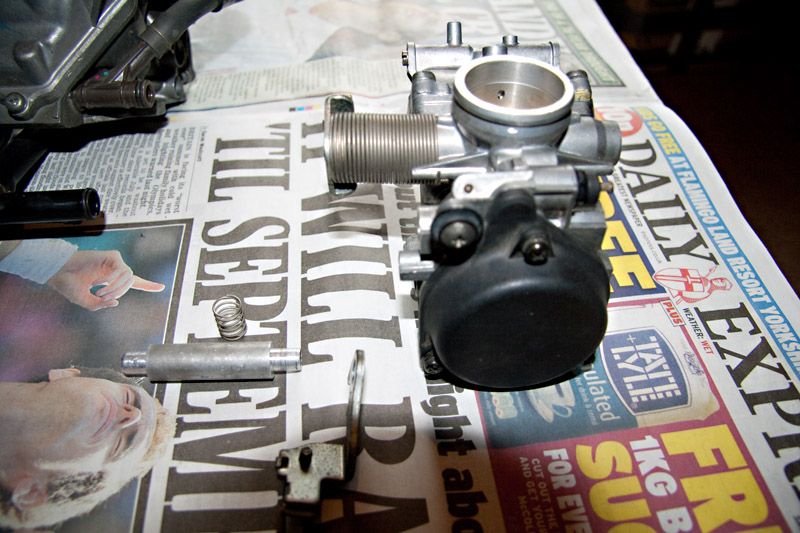
A look at the bottom of carb 4, showing the float bowl. The brass screw next with the cross slotted top is the pilot screw (16016-KBH-000, £13.37). Standard setting is 1 5/8 turns out. If you are not splitting the carbs to remove the float bowls, be very careful with the lower screw. The fuel joint pipe between the carbs makes access awkward if you only have a short screwdriver, and the 5x16mm screws (93892-05016-10, £0.50) are quite soft and easily damaged.

Here is what the pilot screw looks like when it has been removed. It has a spring under it, followed by a washer and an o-ring. The spring and washer are only sold with the screw itself, however, the o-ring is available without having to buy the screw. Unfortunately, it comes with the gasket set for the whole carb, and for that you could buy a new screw and a pint of beer too.... Note that the washer and o-ring may very well need persuading out of the carb using a needle (or the sewing variety, not carb...
  ) as they may be gummed up with fuel residue if the carbs have sat for a while.

Three wheels on my wagon, or something like that... To the right of the carbs can be seen the long, fatter balance pipe or whatever you want to call it that goes to the sub air cleaner. Honda call all the t-pieces fuel joint sets, although considering where these particular ones go, I'd be a bit worried about neat fuel making it's way there! It's probably standard hose, however is you really need to replace it and really want a genuine part, it's 16199-MR8-900 and EUR5.48. The joint itself, 16026-MR7-004, is a mammoth £23.25 ex VAT, and of course there are two of them (we haven't met the second yet). The last time I hard my carbs done, several of the joint pipes needed replacing as they apparently crumbled to bits, leaving a huge hole in my wallet! They are held together with clips 15772-292-010, £0.95). The other thing to note is that you can now see the idle adjuster paddle a bit more clearly. There are two adjusting screws on the front carbs, one balances them to each other, and the other balances the front and rear pairs together. The spring I mentioned earlier sits under this paddle, and the paddle from the other carb sits below that. There is a raised pip on the latter for it to sit on so it doesn't fall out, and this also helps keep it in place when you take the carbs apart, however it makes it a right pain to get back in!
Carb 3, from the side and upsidedown. As mentioned before, note the wiring loom clamp on the end of the joining rod. In this pic you can see the thin balance pipe that goes between the front carbs, and also the the fuel feed joint pipe. I'm pretty sure these are the ones that needed replacing on my carbs last time around. If you are unlucky, they are 16026-KV0-014 and weigh in at £21.88 each. You can also see the carb balance adjuster and it's linkage that joins the front and rear carb pairs together. The fuel hose leading to the fuel joint (16143-MR8-900, £5.20) feels a little brittle to me, so I may consider replacing it when rebuilding. It's opposite number is slightly different, 16144-mr8-900, £5.40.
Another quick look at the rear carbs. The choke operating bar has been removed. This is identical to the one for the other carbs. As you can see, the thrust spring is different for this pair, and some more comedy value. It is part 16050-MZ5-600, which Honda deem worthy of a £9.28 price tag!
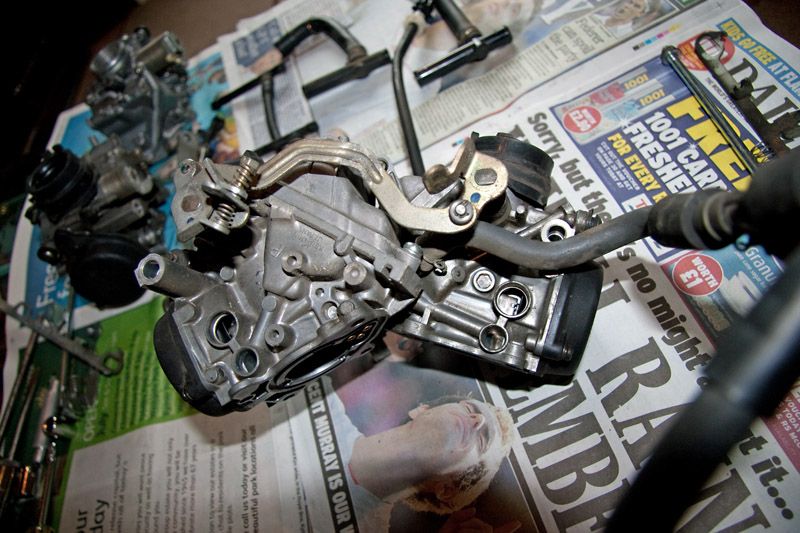
After pulling carb 3 away from carb 1, you will be left with this. Carbs 1 (foreground) and 2 are joined by the linkage that transfers the butterfly opening movement from the rear carbs to the front. You can see the spacer that fits between carbs 1 and 3, which is identical to the one between 2 and 4. On this spacer is also the bar that the choke linkage pivots on. I have neglected to take a photo of this (ooops!) As the choke operating bars have been removed, this simply slides off of the spacers. Neither the operating rod nor the pivot bar can be obtained any more, so be very careful with them. In the background on the left, for another dose of odd and high prices, you can see the thinner carb joint pipes (16047-ke7-003, £19.95) and their vent hoses (16142-mr8-003, £7.40). These hoses come as a pair, and are attached using hose clips 16163-mb3-671, which are smaller than all the others used, but cost £1.53 instead of £0.95 for the rest. Whatever....!
Side view of carbs 1 and 2 with the choke linkage removed. There is a better view of the spring arrangement on the balance paddle that will hopefully explain a bit better how the screw and two springs are arranged. The butterfly opening linkage is attached at both ends with a split pin. Behind this is a metal washer, and behind that is a plastic one, underneath this is the bar itself, and there is another plastic washer between the bar and the carb. The linkage bar comes with the split pins and washers as a set, and is no longer available. In my case, one of the plastic washers is split, so something will have to be found from elsewhere. No pic yet as the one I took was even more rubbish than the others!
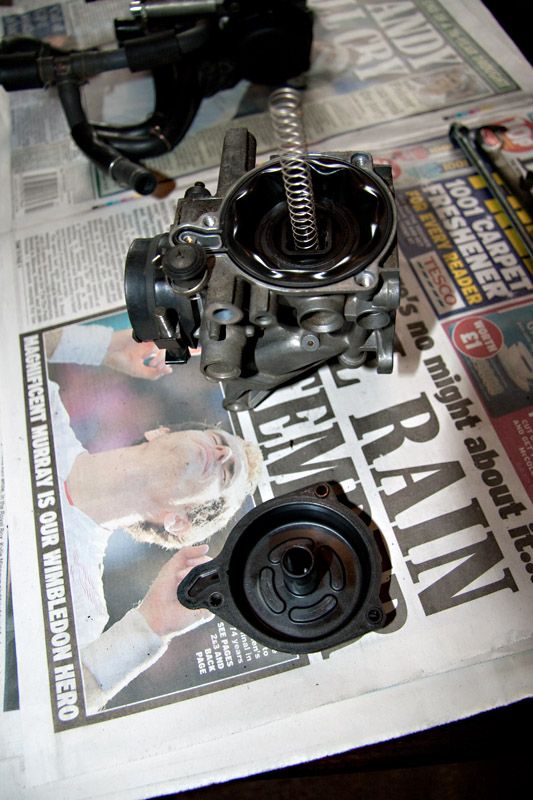
OK, so on to the bit people might be more interested in, what's inside the things and how they are different to the NC30.... So, back out with the cross headed screwdriver and whip off the three screws (16080-MV4-000, £0.82) holding on the piston cover (16107-kaz-000, £32.65). Be careful when taking the cover off, and there is the very large piston spring under it (16051-MR8-900, £8.20). Some people choose to replace these springs with HRC replica ones from Rick Oliver. See the NC30 DIY carb jetting guide/thread for more details.
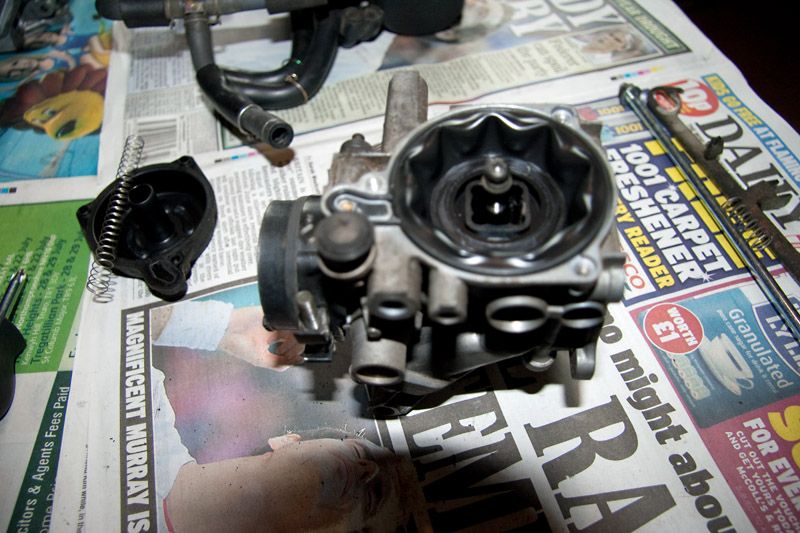
The next stage is to remove the needle spring holder (16037-KAZ-000, £15.60). This is done most easily by getting one of the piston cover screws and screwing it into the holder. It seems to be threaded for this purpose and the pic shows this done. With one hand hold the piston in place, and with the other pull the holder out using the spring. It isn't very tightly fitted, so should be no problem. There is a small spring inside this holder, although it shouldn't fall out. However, don't take any chances, as this is another item for the comedy price list. It is 16051-MV4-000 and £10.01 ex VAT!
Next, remove the piston and needle. The easiest way to do this is to put your finger in the hole where the needle spring holder was and very gently withdraw the piston, taking care not to damage the diaphragm, which is the holy grail of the comedy prices. If all goes well, it will come out inverted, which also makes it very easy to put back in later on. Here we see the needle spring holder and the piston (16111-MR8-900, a mere £101.90 ex VAT from DSS or EUR106 ex VAT if you go to CMS), with the needle still in it. Check the piston carefully for any signs of holes, splits or any other damage, and also to make sure it's nice and supple and hasn't dried out. If it's no good then you have my sympathy!
The needle (16027-MR8-900, £24.07) should come out if you turn the piston assembly over. There is a washer at the bottom of it, although in my case the washer had become stuck to the inside of the piston due to the fuel residue. There are numerous different needles available, and at the time of writing I forget the short code for the standard ones like this. The washer (or shim if you prefer) isn't available on it's own from Honda, however there are other sources such as Rick Oliver if you wish to replace it and/or fiddle with the needle height. This pic is shocking, so a better one will follow....
Here's a quick look at what I was going on about for putting the piston back. If you put it on top of the carb like this, you can gently slide the slide back into the carb body and the diaphragm will invert while the edge stays nicely in the groove for sealing with the cover. If you have the diaphragm the right way around before refitting, it's a bit more fiddly getting the edge seated.
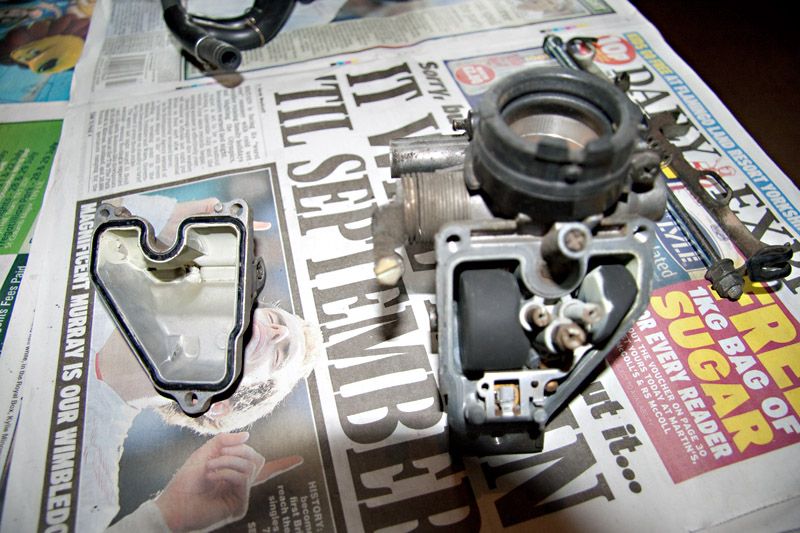
Sorry, another fairly poor pic. Here's a carb with the float bowl removed. All the stuff that looks like anaemic custard power is the wonderful/useless/indifferent/whatever stuff that gets added to petrol to allegedly increase fuel miles, keep our engines clean and do other wonderful stuff as well. I doubt much of it used to be real petrol. The float bowl gaskets on these carbs are hard as a rock and unsuitable for reuse, not that it is recommended in print to do so anyway. Inside the carb body, the big black bit and the smaller black bit with the custard powder on the side are the float. In the middle between the two sides of the float are the slow/idle jet (left, upper), main jet and emulsion tube (centre, lower) and I'm not quite sure what the other bit on the right upper side of the main jet is, however it seems very firmly fitted and doesn't appear on the parts diagram! The slow jet comes out with a flat bladed screwdriver, as does the main jet. Then you need a 7mm socket to remove the emulsion tube. This needs to be fairly slim as the unidentified tube on the right is very close. The float bowl has a drain screw in it, which can be removed with either a flat screwdriver, or seemingly with an allen key. I used the former so I don't know what size allen would be used. Yet again, do not lose or damage it, as it only comes with the float bowl (16015-MR8-900 for 1+4 and 16023-mr8-900 for 2+3, EUR56 if they can be sourced), although the o-ring is part of the gasket set.
Here we have another very ordinary picture, showing the emulsion tube (left), main jet (middle) and slow jet (right). Take car to note that the emulsion tubes are different from front to rear. This was carb 2 if I'm looking at it right, which makes it a front emulsion tube (16165-MR8-900, £18.28), assuming a previous owner didn't mix them up. The rear cylinders have a different one (16166-mr8-900, £18.28) with different spacing. Standard slow jets (99103-mt2-0350, £8.36) are #35 and it seems unusual for people to change the size, however the size is part of the part number, like the main jets. Standard mains are #108 (99101-393-1080 (393 part of the code now superceded GHB), and £6.87 apiece. I will be going up to #112 on account of a Scorpion pipe, so the part number will change accordingly. Make sure the screwdriver is a good, deep fit in the slot of the jets as it is very easy to damage them with an overly large blade that doesn't go all the way to the bottom. I took a lump out of one of them, but as I'm not anticipating using them again it's not an issue.
Yet another bad pic. Here I have replaced the emulsion tube and jets, and started to remove the float. This is where you need an implement to push the pivot pin out. It's not an overly tight fit, so presents little difficulty. Another one for the do not lose pile, the pin is not available on it's own, so unless you buy a new float (16013-MR8-900, EUR35.00) then it's off to the scrap box or out with a caliper to measure another one to see if you can find something the same diameter to replace it.
Here is the float removed from the carb. Be careful when lifting it out because the float valve is connected to it with a fairly delicate looking wire spring that you do not want to damage. The float valve need to be checked for any wear or damage, and if it needs replacing it's another wallet basher, being 16155-MR8-900 and £27.64...
So, that's pretty much it for now. In due course I'll get some better pictures, and use something that doesn't have a pic of that brat Scot tennis player on it...
Just as a footnote, until this point I haven't posted any part numbers or prices for the gaskets and o-rings, mainly because I'd be repeating myself as they come in sets. Some people don't bother replacing them, others do. I'm not going to advise one way or the other as it probably depends on the age of them as much as anything else. However, with these carbs, I'm going to change the lot as most of them have dried out and cracked.
Note the following if you decide that you want to replace any of the rubbery bits:
The carb gasket set (16010-MR8-900, £17.15) is, sadly, a set for ONE carb. Therefore you need to shell out four times to do them all. It contains the gasket that goes between the carb and airbox, the float bowl gasket, the float bowl drain screw o-ring, the pilot screw o-ring, and the needle holder o-ring. None of these parts can be obtained individually, however the if you can find a float bowl new it comes with a gasket, drain screw and drain screw o-ring, and the needle holder is also supplied with it's o-ring.
The pipe gasket set (16040-MR7-004, £26.33) contains all the o-rings for the six joint pipes (two fuel feed, two overflow, two sub air filter), so unlike the carb set, one purchase does all. If you need to change one of the pipes if it is damaged, then you will get the o-rings with it according to the diagram.
Note that the prices above come from two sources. Being based in the UK myself I've used David Silver Spares wherever they have a price for something. As they buy surplus stock, you may find that dealer prices are higher for some stuff, or possibly even lower. I have no connection to them other than as a customer. For the few things they didn't have a price for, I found CMSNL.com to be handy. This is why some prices are quoted in Euros. Their prices are different to DSS, some less, some more, but if you are only ordering a few bits then by the time you've paid postage and a fee for buying in Euros from you card company, it would probably make little difference. Please note that the prices I've used are excluding VAT unless specified.
Finally, the ultimate laugh. CMSNL have a price for a full set of carbs and also one on it's own, however no indication of availability, but that gives something for comparison to the parts prices. If you think the equivalent of £1050 for a set or £395 each (if they are all the same price, which I doubt) if they can get them is a bit steep, try adding up the individual bits. I've already mentioned above that parts like the joining rods, butterfly and choke linkages and a few other bits aren't available any more, however if you add up the cost of all the bits you CAN get, the total is......... just under £2600 in VAT.
Edit:
Actually, I had a sudden thought last night... I missed a bit.

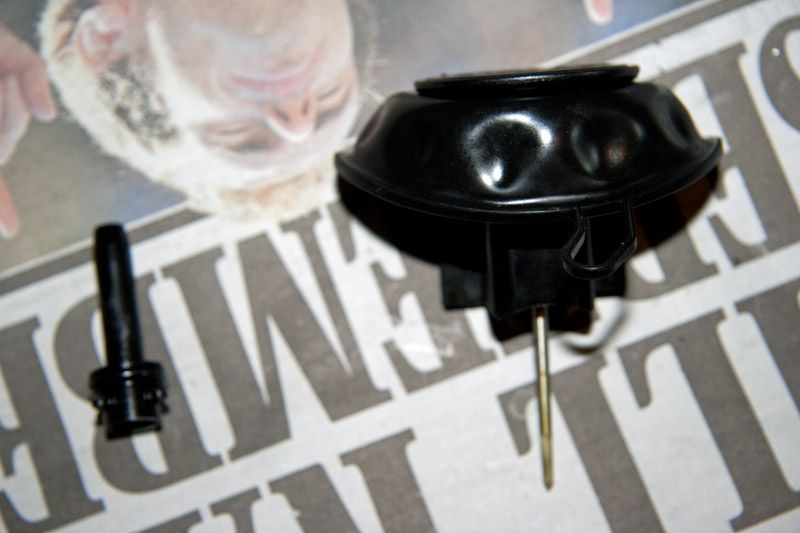
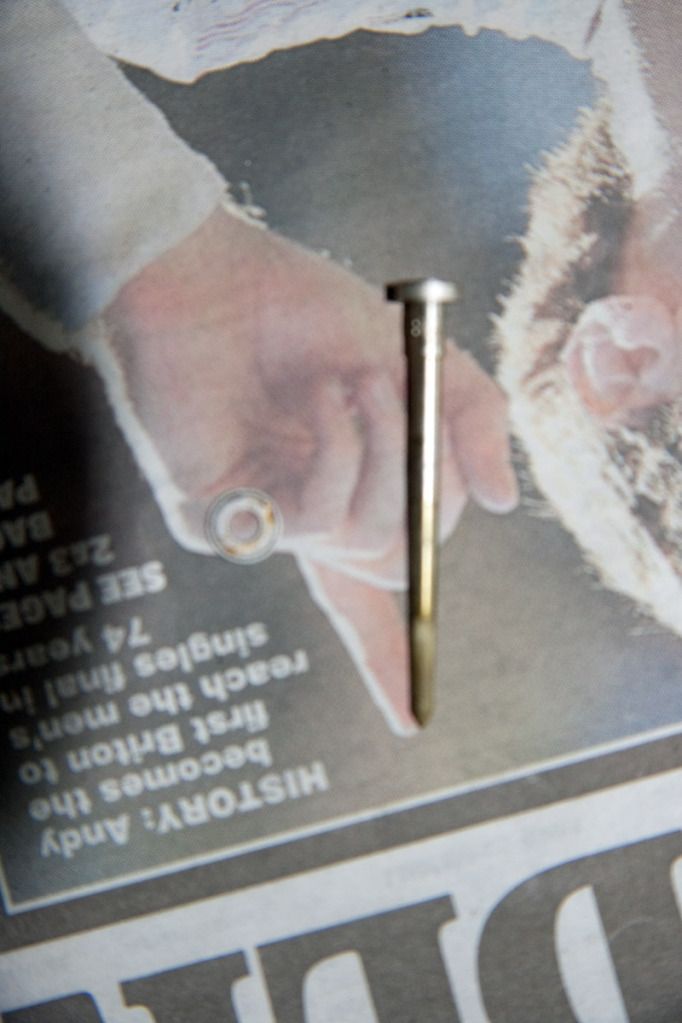
Here, I have removed the cover from the choke plunger, or as Honda call it, the starter valve. You need a 10mm socket to do this. The rubber cover is part of the threaded plastic holder for the plunger, so as ever, a little care is needed to avoid damage.
With everything out, you can see what the plunger looks like. The end nearest the bottom of the picture is where the choke operating bar locates. None of these three parts can be obtained on their own, so will have to be replaced as a set (16046-MY9-000, £29.02). Ouch once more!
Front left 2 4 right
Rear left 1 3 right
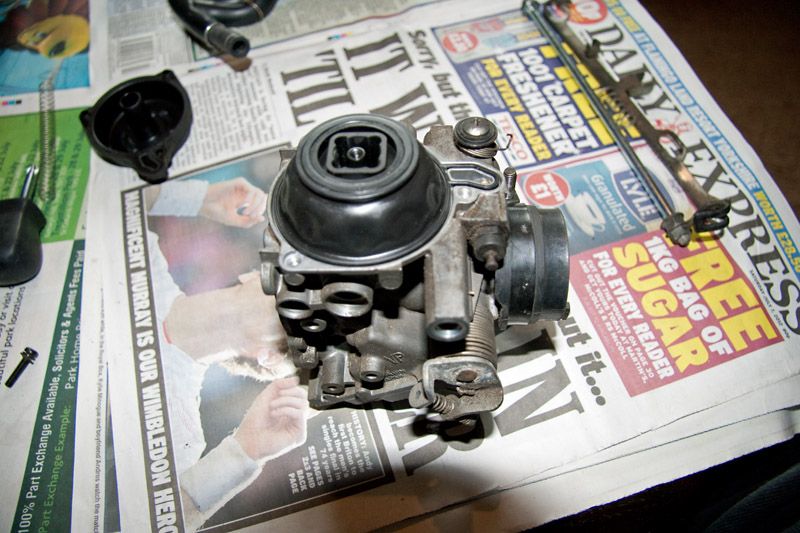
General view of carbs with underside facing up. You are look at the front carbs here, and as they are inverted, it's carb 2 on the left and 4 on the right. Carb 4 is missing it's rubber (or insulator as Honda call it) as this was the one I experimented with in the ultrasonic bath. Despite only having washing up liquid, you can tell the difference already. The carb rubbers go hard over time, and apparently if left with either or both ends off the bike or carbs for any length of time they start going even harder, misshapen and shrink. They are not identical, cyls 1+4 (16211-MR8-900, £6.95) and cyls 2+3 (16221-MR8-900, £4.75) having different ones. Not exactly cheap for a set, and often hard to get hold of.
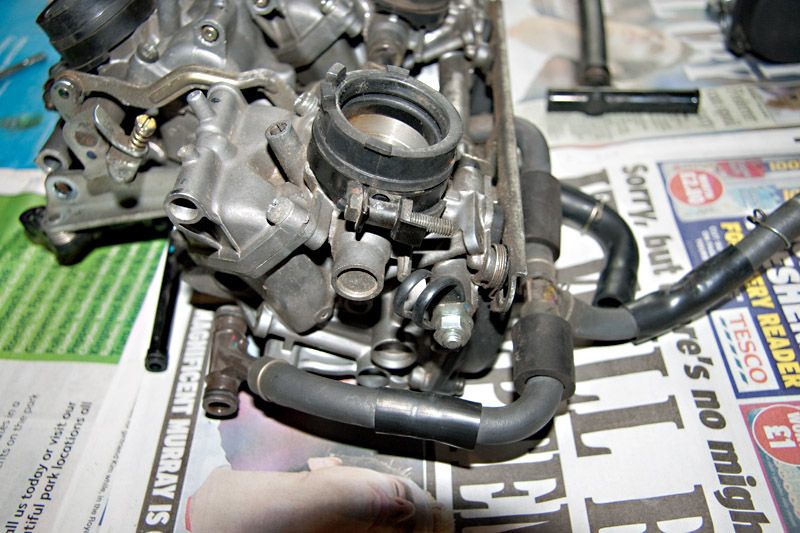
Side view of carbs 4 and 3. The rubber hose between them is the fuel feed from the tank, and the pipe connected to it that goes to the tank itself can be seen at the right side of the pic. You can also just see one of the pipes that goes to the sub air cleaner element. Please note that the clamp for the carb rubber is NOT in the right orientation if you want to be able to slacken it when the carbs are on the bike as the screw head should be facing the camera, not facing across the shot - I didn't really think about this when I did the thing up! If you lose or break these clamps, they are 16219-MR8-900 and cost a whopping £4.95 each If you've only lost the square nut, it's 16222-MV4-300 (89p), and the 5x28mm bolt is 90023-MM5-000 (1.09). It does not appear that the spacer that goes in the middle can be purchased on it's own, so don't lose it!
Front view of carbs 1 and 3. As you can see, carb 1 is where the throttle cables and idle adjuster (16029-mr8-900, £23.10) are located. Carb 3 has a wiring loom holder (91410-679-000, £3.46) bolted to it's end of the rod that joins it to carb 1, so don't forget where it came from. Under the fuel pipe mentioned earlier, you can now see both pipes that go to the sub air cleaner, and you can just about make out what I assume are the float bowl overflow pipes by the right of those, under the main fuel pipe. The t-piece you see in the main fuel pipe, like all the others, is eye-wateringly expensive for such a simple piece of plastic, but not as bad as some we'll meet later. It's 16958-MB0-000 at £8.76. All the butterfly clips on the fuel delivery pipe and joints are part 95002-02129, £0.65 each.
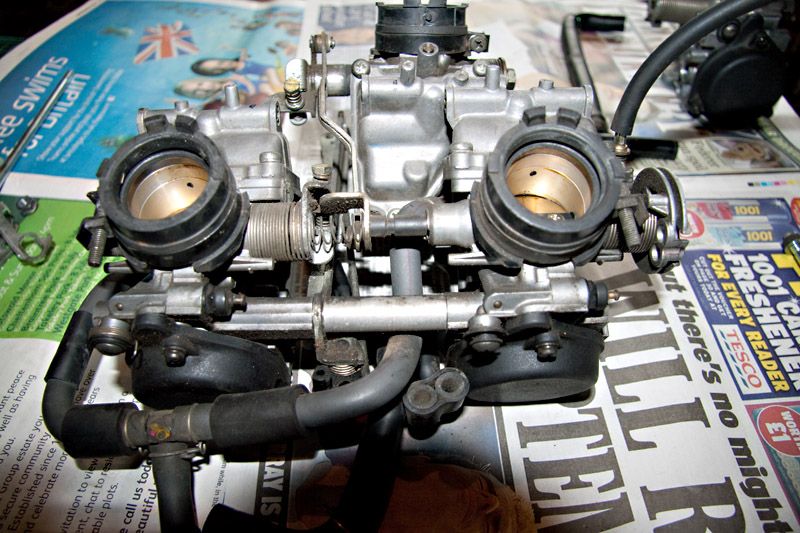
Side view of carbs 1 and 2. Nothing very interesting here, however you can see where the idle adjuster bears against the throttle cable pulley, and also the large silver coloured throttle cable guide (16119-mr8-900, £10.74). Note that the pulley is not available on it's own according to the diagram.
View from the top with the carbs the right way up. The front carbs (2+4) are at the top of the pic, and obviously that means 1+3 are at the bottom. You can see here where the thinner overflow pipes and joiners are located, as well as the thicker ones that go to the sub air cleaner. At the top, the black arm between the carbs is the where the choke cable locates, and the silver bracket is where the choke cable is clamped. In this view, the gaskets that go between the carbs and airbox/velocity stacks (I'm not sure precisely how that lot go together as my carbs came as you see them) are not present.
Right, let's start with the demolition.....! Whip out one of your cross headed screwdrivers and remove the two screws holding the choke operating bar on. The front screws and bar tend to be pretty manky as they are right in the path on any crap that finds it's way up behind the top rad. The screws (16081-KAZ-000, £1.07) and washer (16085-MV4-000, £1.11) aren't exactly cheap, but pale into insignificant in comparison to the plastic collars that go behind the bar (16175-MZ1-000, £8.39) and the spring (16051-MZ5-670, EUR11.50), so it would be rather handy no to lose those either! The bar itself, 16121-MR8-900 is a whopping £28.56 if you are unlucky enough to find that it's corroded to death and not suitable for reuse. The joining rod has a 10mm flanged nut on either end (94050-06000, £0.80). Honda describe this as a 6mm nut, so I assume they are referring to the thread size, not the head.
View from above of the same. The carb joining rod is no longer available, however the rest of the parts here add up to over £70 including VAT between them for two nuts, two screws, four plastic washers, a spring and a bit of metal.... expensive parts labels, Honda ones...
A quick look a bit closer before pulling the first carb off. Of interest here is the spacer between the carbs (no longer available) that has the bracket for the choke cable (16119-MZ5-600, £10.16) between it and carb 2. Also, you will see the smaller spring between the two carbs (16053-MB0-671, EUR5.00) which Honda refers to as a thrust spring. It's not too hard to extract before splitting the carbs, and doing so would probably reduce the risk of losing the thing. Also, there is a spring under the carb adjuster point that you need to be careful with. Not the one that the screw screws through, but under the paddle this one presses against, there is another one between that paddle and the one underneath. It will probably stay where it is when the carbs are split, but be very careful it doesn't escape. Fortunately, they can still be found (16052-MV4-000, £2.28), and are a lot cheaper than the adjuster screws and springs (16028-MR8-900, EUR25.5) which are silly money!
Here is carb 4 removed from the group. Note the thrust spring, spacer and choke cable mount. It looks reasonably clean because it's the one that has already had a bath. In order not to lose any of the bits from the choke bar, I temporarily put them back on it.
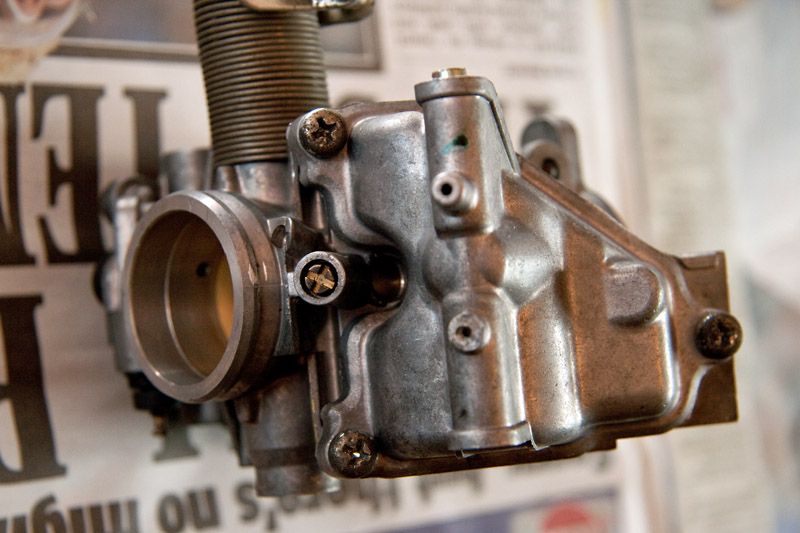
A look at the bottom of carb 4, showing the float bowl. The brass screw next with the cross slotted top is the pilot screw (16016-KBH-000, £13.37). Standard setting is 1 5/8 turns out. If you are not splitting the carbs to remove the float bowls, be very careful with the lower screw. The fuel joint pipe between the carbs makes access awkward if you only have a short screwdriver, and the 5x16mm screws (93892-05016-10, £0.50) are quite soft and easily damaged.
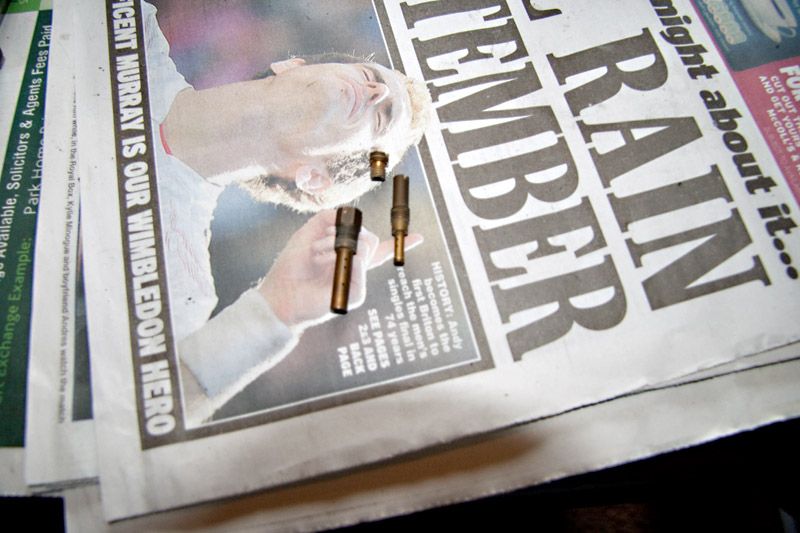
Here is what the pilot screw looks like when it has been removed. It has a spring under it, followed by a washer and an o-ring. The spring and washer are only sold with the screw itself, however, the o-ring is available without having to buy the screw. Unfortunately, it comes with the gasket set for the whole carb, and for that you could buy a new screw and a pint of beer too....
Three wheels on my wagon, or something like that... To the right of the carbs can be seen the long, fatter balance pipe or whatever you want to call it that goes to the sub air cleaner. Honda call all the t-pieces fuel joint sets, although considering where these particular ones go, I'd be a bit worried about neat fuel making it's way there! It's probably standard hose, however is you really need to replace it and really want a genuine part, it's 16199-MR8-900 and EUR5.48. The joint itself, 16026-MR7-004, is a mammoth £23.25 ex VAT, and of course there are two of them (we haven't met the second yet). The last time I hard my carbs done, several of the joint pipes needed replacing as they apparently crumbled to bits, leaving a huge hole in my wallet! They are held together with clips 15772-292-010, £0.95). The other thing to note is that you can now see the idle adjuster paddle a bit more clearly. There are two adjusting screws on the front carbs, one balances them to each other, and the other balances the front and rear pairs together. The spring I mentioned earlier sits under this paddle, and the paddle from the other carb sits below that. There is a raised pip on the latter for it to sit on so it doesn't fall out, and this also helps keep it in place when you take the carbs apart, however it makes it a right pain to get back in!
Carb 3, from the side and upsidedown. As mentioned before, note the wiring loom clamp on the end of the joining rod. In this pic you can see the thin balance pipe that goes between the front carbs, and also the the fuel feed joint pipe. I'm pretty sure these are the ones that needed replacing on my carbs last time around. If you are unlucky, they are 16026-KV0-014 and weigh in at £21.88 each. You can also see the carb balance adjuster and it's linkage that joins the front and rear carb pairs together. The fuel hose leading to the fuel joint (16143-MR8-900, £5.20) feels a little brittle to me, so I may consider replacing it when rebuilding. It's opposite number is slightly different, 16144-mr8-900, £5.40.
Another quick look at the rear carbs. The choke operating bar has been removed. This is identical to the one for the other carbs. As you can see, the thrust spring is different for this pair, and some more comedy value. It is part 16050-MZ5-600, which Honda deem worthy of a £9.28 price tag!
After pulling carb 3 away from carb 1, you will be left with this. Carbs 1 (foreground) and 2 are joined by the linkage that transfers the butterfly opening movement from the rear carbs to the front. You can see the spacer that fits between carbs 1 and 3, which is identical to the one between 2 and 4. On this spacer is also the bar that the choke linkage pivots on. I have neglected to take a photo of this (ooops!) As the choke operating bars have been removed, this simply slides off of the spacers. Neither the operating rod nor the pivot bar can be obtained any more, so be very careful with them. In the background on the left, for another dose of odd and high prices, you can see the thinner carb joint pipes (16047-ke7-003, £19.95) and their vent hoses (16142-mr8-003, £7.40). These hoses come as a pair, and are attached using hose clips 16163-mb3-671, which are smaller than all the others used, but cost £1.53 instead of £0.95 for the rest. Whatever....!
Side view of carbs 1 and 2 with the choke linkage removed. There is a better view of the spring arrangement on the balance paddle that will hopefully explain a bit better how the screw and two springs are arranged. The butterfly opening linkage is attached at both ends with a split pin. Behind this is a metal washer, and behind that is a plastic one, underneath this is the bar itself, and there is another plastic washer between the bar and the carb. The linkage bar comes with the split pins and washers as a set, and is no longer available. In my case, one of the plastic washers is split, so something will have to be found from elsewhere. No pic yet as the one I took was even more rubbish than the others!
OK, so on to the bit people might be more interested in, what's inside the things and how they are different to the NC30.... So, back out with the cross headed screwdriver and whip off the three screws (16080-MV4-000, £0.82) holding on the piston cover (16107-kaz-000, £32.65). Be careful when taking the cover off, and there is the very large piston spring under it (16051-MR8-900, £8.20). Some people choose to replace these springs with HRC replica ones from Rick Oliver. See the NC30 DIY carb jetting guide/thread for more details.
The next stage is to remove the needle spring holder (16037-KAZ-000, £15.60). This is done most easily by getting one of the piston cover screws and screwing it into the holder. It seems to be threaded for this purpose and the pic shows this done. With one hand hold the piston in place, and with the other pull the holder out using the spring. It isn't very tightly fitted, so should be no problem. There is a small spring inside this holder, although it shouldn't fall out. However, don't take any chances, as this is another item for the comedy price list. It is 16051-MV4-000 and £10.01 ex VAT!
Next, remove the piston and needle. The easiest way to do this is to put your finger in the hole where the needle spring holder was and very gently withdraw the piston, taking care not to damage the diaphragm, which is the holy grail of the comedy prices. If all goes well, it will come out inverted, which also makes it very easy to put back in later on. Here we see the needle spring holder and the piston (16111-MR8-900, a mere £101.90 ex VAT from DSS or EUR106 ex VAT if you go to CMS), with the needle still in it. Check the piston carefully for any signs of holes, splits or any other damage, and also to make sure it's nice and supple and hasn't dried out. If it's no good then you have my sympathy!
The needle (16027-MR8-900, £24.07) should come out if you turn the piston assembly over. There is a washer at the bottom of it, although in my case the washer had become stuck to the inside of the piston due to the fuel residue. There are numerous different needles available, and at the time of writing I forget the short code for the standard ones like this. The washer (or shim if you prefer) isn't available on it's own from Honda, however there are other sources such as Rick Oliver if you wish to replace it and/or fiddle with the needle height. This pic is shocking, so a better one will follow....
Here's a quick look at what I was going on about for putting the piston back. If you put it on top of the carb like this, you can gently slide the slide back into the carb body and the diaphragm will invert while the edge stays nicely in the groove for sealing with the cover. If you have the diaphragm the right way around before refitting, it's a bit more fiddly getting the edge seated.
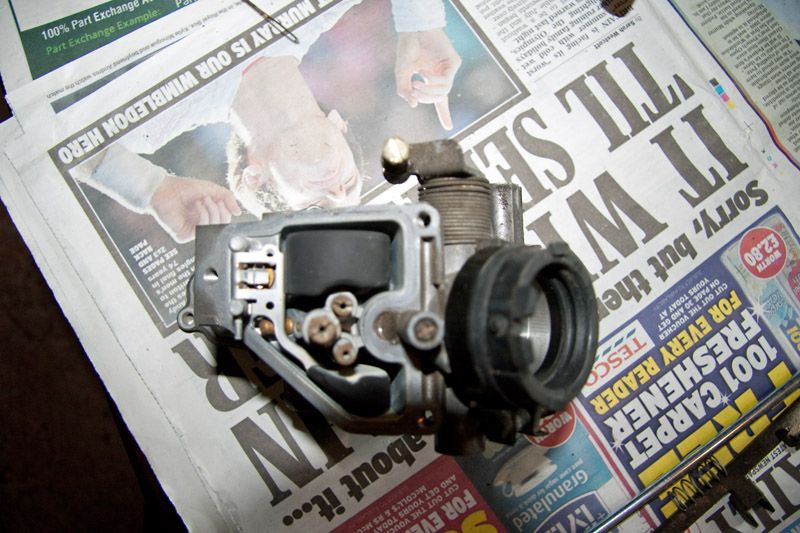
Sorry, another fairly poor pic. Here's a carb with the float bowl removed. All the stuff that looks like anaemic custard power is the wonderful/useless/indifferent/whatever stuff that gets added to petrol to allegedly increase fuel miles, keep our engines clean and do other wonderful stuff as well. I doubt much of it used to be real petrol. The float bowl gaskets on these carbs are hard as a rock and unsuitable for reuse, not that it is recommended in print to do so anyway. Inside the carb body, the big black bit and the smaller black bit with the custard powder on the side are the float. In the middle between the two sides of the float are the slow/idle jet (left, upper), main jet and emulsion tube (centre, lower) and I'm not quite sure what the other bit on the right upper side of the main jet is, however it seems very firmly fitted and doesn't appear on the parts diagram! The slow jet comes out with a flat bladed screwdriver, as does the main jet. Then you need a 7mm socket to remove the emulsion tube. This needs to be fairly slim as the unidentified tube on the right is very close. The float bowl has a drain screw in it, which can be removed with either a flat screwdriver, or seemingly with an allen key. I used the former so I don't know what size allen would be used. Yet again, do not lose or damage it, as it only comes with the float bowl (16015-MR8-900 for 1+4 and 16023-mr8-900 for 2+3, EUR56 if they can be sourced), although the o-ring is part of the gasket set.
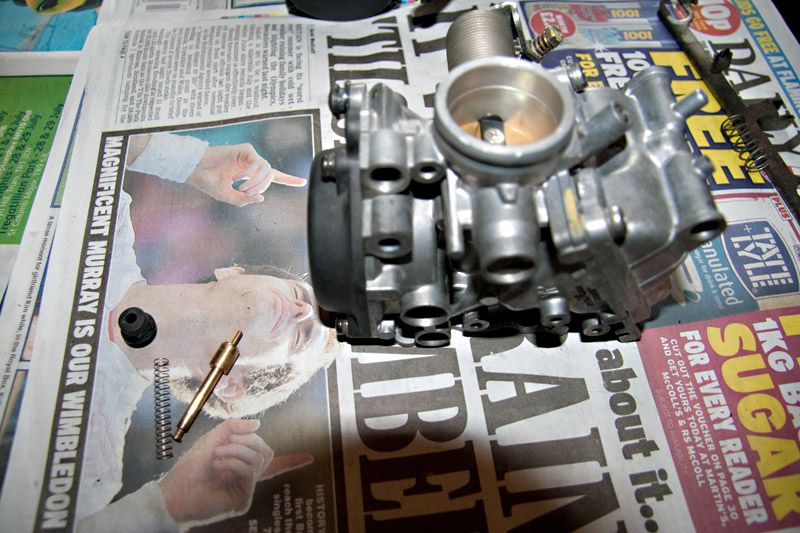
Here we have another very ordinary picture, showing the emulsion tube (left), main jet (middle) and slow jet (right). Take car to note that the emulsion tubes are different from front to rear. This was carb 2 if I'm looking at it right, which makes it a front emulsion tube (16165-MR8-900, £18.28), assuming a previous owner didn't mix them up. The rear cylinders have a different one (16166-mr8-900, £18.28) with different spacing. Standard slow jets (99103-mt2-0350, £8.36) are #35 and it seems unusual for people to change the size, however the size is part of the part number, like the main jets. Standard mains are #108 (99101-393-1080 (393 part of the code now superceded GHB), and £6.87 apiece. I will be going up to #112 on account of a Scorpion pipe, so the part number will change accordingly. Make sure the screwdriver is a good, deep fit in the slot of the jets as it is very easy to damage them with an overly large blade that doesn't go all the way to the bottom. I took a lump out of one of them, but as I'm not anticipating using them again it's not an issue.
Yet another bad pic. Here I have replaced the emulsion tube and jets, and started to remove the float. This is where you need an implement to push the pivot pin out. It's not an overly tight fit, so presents little difficulty. Another one for the do not lose pile, the pin is not available on it's own, so unless you buy a new float (16013-MR8-900, EUR35.00) then it's off to the scrap box or out with a caliper to measure another one to see if you can find something the same diameter to replace it.
Here is the float removed from the carb. Be careful when lifting it out because the float valve is connected to it with a fairly delicate looking wire spring that you do not want to damage. The float valve need to be checked for any wear or damage, and if it needs replacing it's another wallet basher, being 16155-MR8-900 and £27.64...
So, that's pretty much it for now. In due course I'll get some better pictures, and use something that doesn't have a pic of that brat Scot tennis player on it...
Just as a footnote, until this point I haven't posted any part numbers or prices for the gaskets and o-rings, mainly because I'd be repeating myself as they come in sets. Some people don't bother replacing them, others do. I'm not going to advise one way or the other as it probably depends on the age of them as much as anything else. However, with these carbs, I'm going to change the lot as most of them have dried out and cracked.
Note the following if you decide that you want to replace any of the rubbery bits:
The carb gasket set (16010-MR8-900, £17.15) is, sadly, a set for ONE carb. Therefore you need to shell out four times to do them all. It contains the gasket that goes between the carb and airbox, the float bowl gasket, the float bowl drain screw o-ring, the pilot screw o-ring, and the needle holder o-ring. None of these parts can be obtained individually, however the if you can find a float bowl new it comes with a gasket, drain screw and drain screw o-ring, and the needle holder is also supplied with it's o-ring.
The pipe gasket set (16040-MR7-004, £26.33) contains all the o-rings for the six joint pipes (two fuel feed, two overflow, two sub air filter), so unlike the carb set, one purchase does all. If you need to change one of the pipes if it is damaged, then you will get the o-rings with it according to the diagram.
Note that the prices above come from two sources. Being based in the UK myself I've used David Silver Spares wherever they have a price for something. As they buy surplus stock, you may find that dealer prices are higher for some stuff, or possibly even lower. I have no connection to them other than as a customer. For the few things they didn't have a price for, I found CMSNL.com to be handy. This is why some prices are quoted in Euros. Their prices are different to DSS, some less, some more, but if you are only ordering a few bits then by the time you've paid postage and a fee for buying in Euros from you card company, it would probably make little difference. Please note that the prices I've used are excluding VAT unless specified.
Finally, the ultimate laugh. CMSNL have a price for a full set of carbs and also one on it's own, however no indication of availability, but that gives something for comparison to the parts prices. If you think the equivalent of £1050 for a set or £395 each (if they are all the same price, which I doubt) if they can get them is a bit steep, try adding up the individual bits. I've already mentioned above that parts like the joining rods, butterfly and choke linkages and a few other bits aren't available any more, however if you add up the cost of all the bits you CAN get, the total is......... just under £2600 in VAT.
Edit:
Actually, I had a sudden thought last night... I missed a bit.
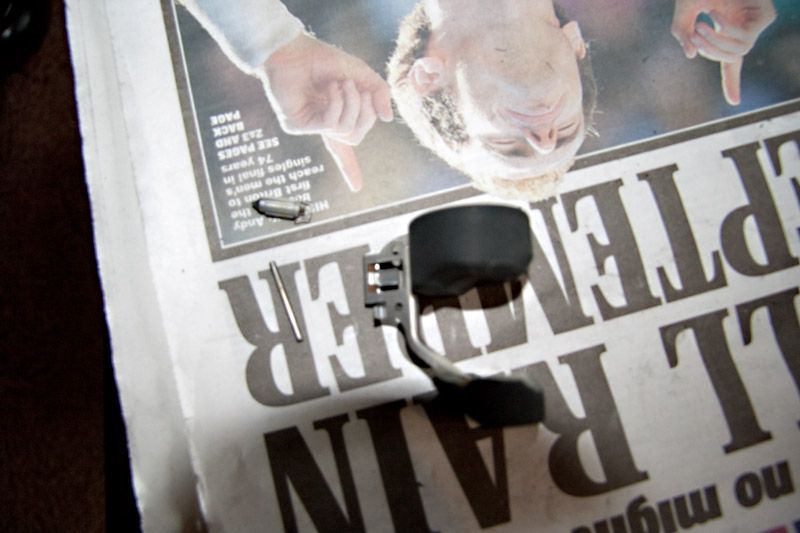
Here, I have removed the cover from the choke plunger, or as Honda call it, the starter valve. You need a 10mm socket to do this. The rubber cover is part of the threaded plastic holder for the plunger, so as ever, a little care is needed to avoid damage.
With everything out, you can see what the plunger looks like. The end nearest the bottom of the picture is where the choke operating bar locates. None of these three parts can be obtained on their own, so will have to be replaced as a set (16046-MY9-000, £29.02). Ouch once more!
-
CRM

- Admin NWAA

- Posts: 2973
- Joined: Sat Apr 05, 2008 2:06 pm
- Location: NorthWest
- Contact:
Re: NC35 carb change
good post.
some of those prices are eye watering.
surely better to make a good set from a couple of sets of carbs.
some of those prices are eye watering.
surely better to make a good set from a couple of sets of carbs.
Insert Signature Here
-
Drunkn Munky

- Site Supporter
- Posts: 6313
- Joined: Thu May 01, 2008 9:37 am
- Bike owned: NC30 MC21 TZR FZR GSXR RG MITO
- Location: Kent
Re: NC35 carb change
Great detailed post, when you doing one on the engine