Valve Clearance Guide
Forum rules
Please can you post items for sale or wanted in the correct For Sale section. Items / bikes for sale here will be removed without warning. Reasons for this are in the FAQ. Thanks
Please can you post items for sale or wanted in the correct For Sale section. Items / bikes for sale here will be removed without warning. Reasons for this are in the FAQ. Thanks
-
viper_biker

- Moderators

- Reactions:
- Posts: 1798
- Joined: Sun Apr 06, 2008 11:25 am
- Bike owned: VFR400RR, CBR1000RR6
- Location: Belfast, Norn Iron
- Contact:
Valve Clearance Guide
THE WORDs AND PICTURES BELOW ARE MY OWN WORK AND NOT ENDORSED BY 400 GREYBIKE. IF YOU USE THIS GUID AND YOU DAMAGE YOUR ENGINE NEITHER THE SITE NOR MYSELF ARE RESPONSIBLE. IT IS TO BE USED AS A VIEW ONLY DOCUMENT AND IF YOU ARE CARRYING OUT THE SAME WORK THEN YOU ALONE ARE RESPONSIBLE FOR YOUR ACTIONS.
IF YOU DON'T KNOW WHAT YOU ARE DOING THEN PAY TO GET IT DONE
This will be added to along with other guides. Remember, if this has been of any help, why not donate a few quid to the running of the site, thank you.
Firstly this is what you'll need,
- Ratchet with a 10mm, 14mm and 17mm socket,
- Feeler gauge that can measure between 0.12mm-0.18mm and 0.21mm-0.27mm
- And possibly a flat headed screwdriver to carefully help you separate the cylinder head from the block.
OK, so you will need to strip pretty much all of the bike (this is where the dealer gets you in labour costs). So,
- Bodywork off
- Tank, airbox, carbs out
- Top radiator off (or dropped to allow you access to the front head)
(If you don't know how to do any of the above please consult the Haynes manual)
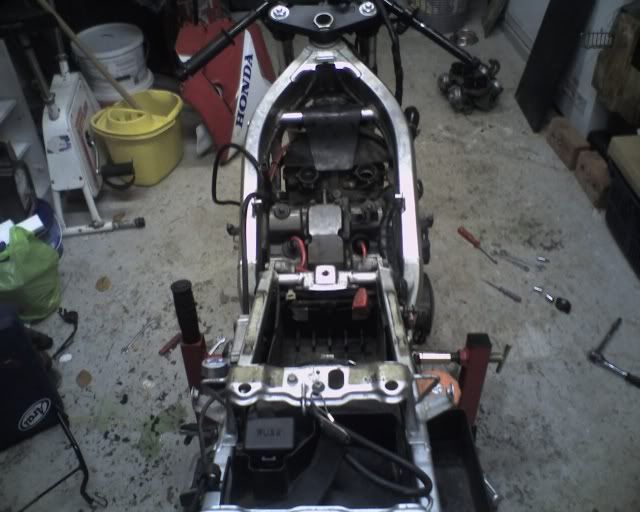
Your bike should now look like this (pic is from an '89 NC30 I re-built last year [:D])
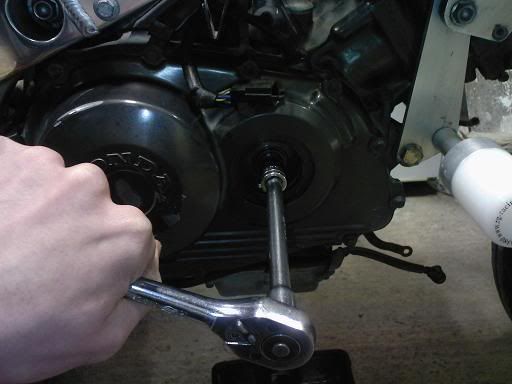
Now for the fun stuff. First of all remove the 4 bolts that holds the head in place. They are 10mm hex head screws,
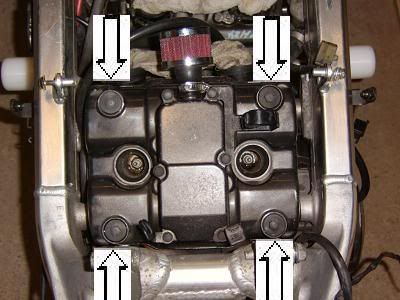
Once removed carefully use a flat head screw driver to prise off the cam cover. Once off it will now look like this,
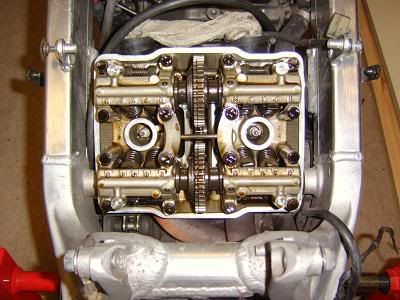
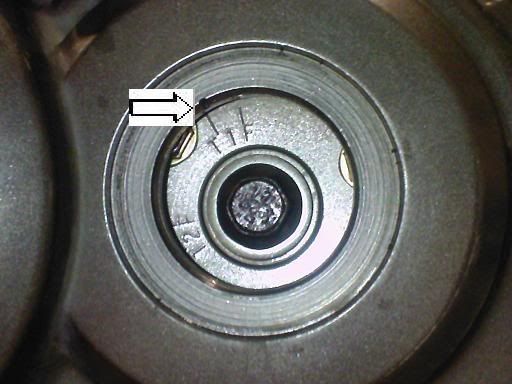
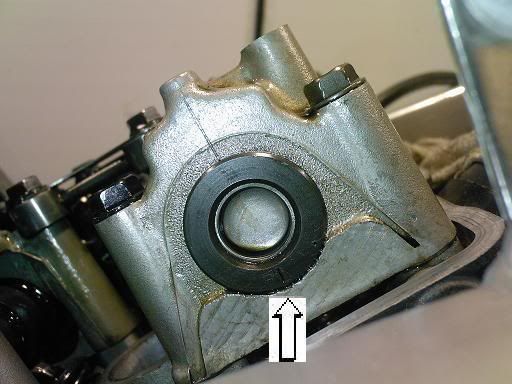
Looks scary don't it. Don't be scared, if you're lucky you'll not need to replace any of the shims. Next up is to remove the Timing Hole Cap. A 17mm socket will sort that out to allow you access to the Timing nut adjuster thingy (a very technical term, 'I will not buy this record, it is scratched' [:D])
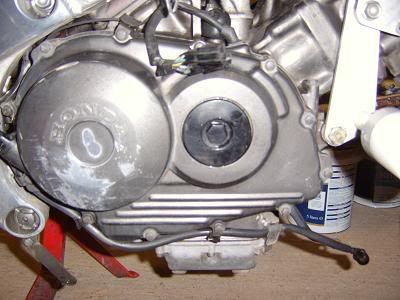
Next up you'll need the 14mm socket to turn the engine over.
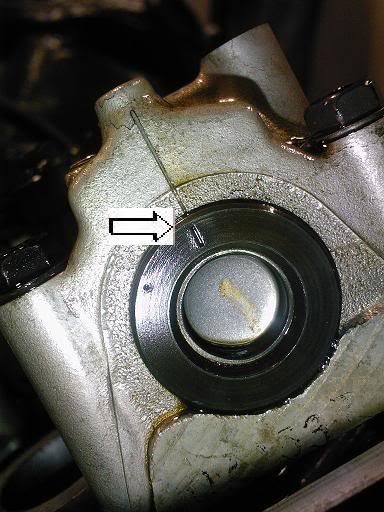
Turn until you get both of these marks lined up. T1 and the mark on the casing, and the other 2 lines to match on the top of the cam shaft.
And
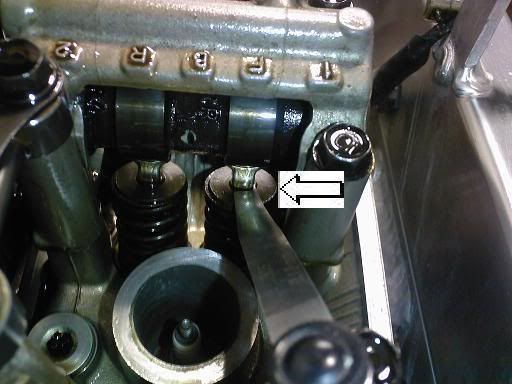
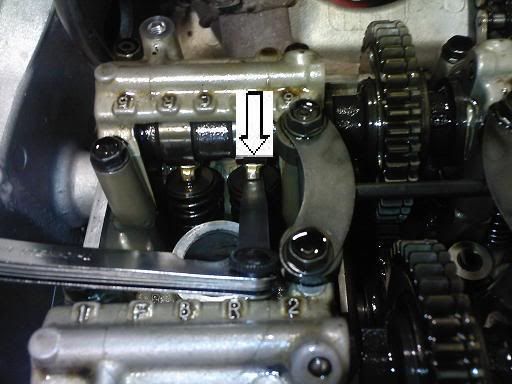
The hard work is behind you now. Next up is to check the gap between the shim and the camshaft (the long rod that has egg shaped things on it) When the lines are the same as the above pics you are then free to check the gap on cylinder no. 1 (rear left when sitting on the bike). There are 4 valves/shims per cylinder (and there are 4 cylinders making the bike, yes you guessed it, 16 valve [:D]) that need checking now. The front 2 are known as inlet valves and the rear 2 are exhaust valves. The tolerance for all the inlet valves on the bike are 0.12mm-0.18mm so take out your feeler gauge and check it now. If it is within tolerance a gauge should fit in like so.
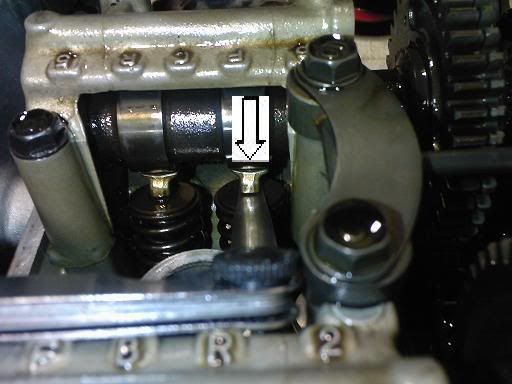
And the rear should be between 0.21mm-0.27mm and should fit like so,
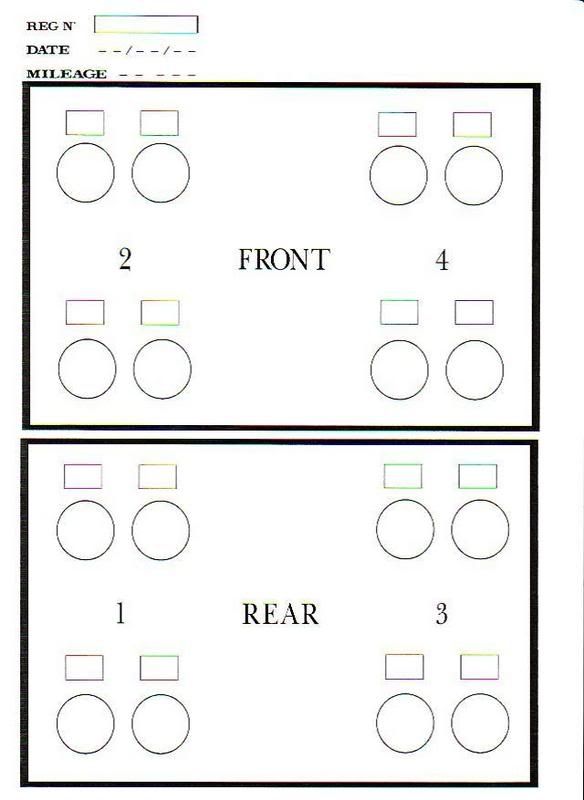
Once you know what the gap is please use the following page to write it down for future reference.
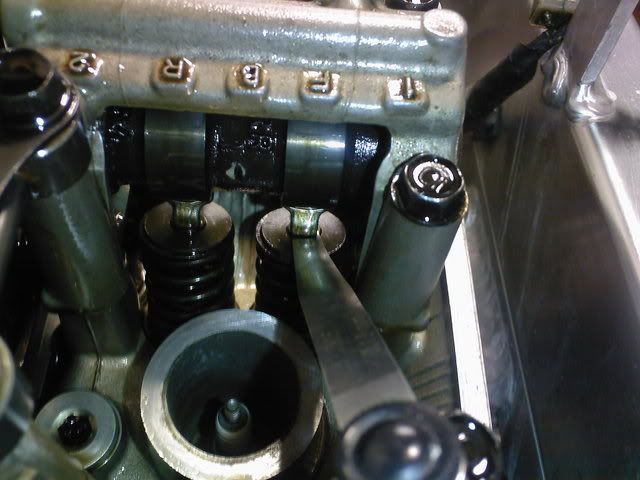
Once you have Cylinder no. 1's gap it's then time to do cyliner no. 3 (this is the one to the right of no. 1. Turn the Timing nut again until you get back to T1 again and the cam shaft will now line up in the opposite way to the way it did on cylinder no. 1.
Once you are at this stage you can then start to check the clearance on cylinder no. 3. Again the front 2 are the inlet valves and the rear are exhaust valves and the tolerances are still 0.12mm-0.18mm on the inlet valves and 0.21-mm-0.27mm on the exhaust valves. The following pics look the same as the ones above but believe me, thay are from cylinder no. 3. If you look really close you'll notice that.
Inlet valves
Exhaust valves
IF YOU DON'T KNOW WHAT YOU ARE DOING THEN PAY TO GET IT DONE
This will be added to along with other guides. Remember, if this has been of any help, why not donate a few quid to the running of the site, thank you.
Firstly this is what you'll need,
- Ratchet with a 10mm, 14mm and 17mm socket,
- Feeler gauge that can measure between 0.12mm-0.18mm and 0.21mm-0.27mm
- And possibly a flat headed screwdriver to carefully help you separate the cylinder head from the block.
OK, so you will need to strip pretty much all of the bike (this is where the dealer gets you in labour costs). So,
- Bodywork off
- Tank, airbox, carbs out
- Top radiator off (or dropped to allow you access to the front head)
(If you don't know how to do any of the above please consult the Haynes manual)
Your bike should now look like this (pic is from an '89 NC30 I re-built last year [:D])
Now for the fun stuff. First of all remove the 4 bolts that holds the head in place. They are 10mm hex head screws,
Once removed carefully use a flat head screw driver to prise off the cam cover. Once off it will now look like this,
Looks scary don't it. Don't be scared, if you're lucky you'll not need to replace any of the shims. Next up is to remove the Timing Hole Cap. A 17mm socket will sort that out to allow you access to the Timing nut adjuster thingy (a very technical term, 'I will not buy this record, it is scratched' [:D])
Next up you'll need the 14mm socket to turn the engine over.
Turn until you get both of these marks lined up. T1 and the mark on the casing, and the other 2 lines to match on the top of the cam shaft.
And
The hard work is behind you now. Next up is to check the gap between the shim and the camshaft (the long rod that has egg shaped things on it) When the lines are the same as the above pics you are then free to check the gap on cylinder no. 1 (rear left when sitting on the bike). There are 4 valves/shims per cylinder (and there are 4 cylinders making the bike, yes you guessed it, 16 valve [:D]) that need checking now. The front 2 are known as inlet valves and the rear 2 are exhaust valves. The tolerance for all the inlet valves on the bike are 0.12mm-0.18mm so take out your feeler gauge and check it now. If it is within tolerance a gauge should fit in like so.
And the rear should be between 0.21mm-0.27mm and should fit like so,
Once you know what the gap is please use the following page to write it down for future reference.
Once you have Cylinder no. 1's gap it's then time to do cyliner no. 3 (this is the one to the right of no. 1. Turn the Timing nut again until you get back to T1 again and the cam shaft will now line up in the opposite way to the way it did on cylinder no. 1.
Once you are at this stage you can then start to check the clearance on cylinder no. 3. Again the front 2 are the inlet valves and the rear are exhaust valves and the tolerances are still 0.12mm-0.18mm on the inlet valves and 0.21-mm-0.27mm on the exhaust valves. The following pics look the same as the ones above but believe me, thay are from cylinder no. 3. If you look really close you'll notice that.
Inlet valves
Exhaust valves
Ducati 916, not worth a carrott
-
spooky

- Site Supporter

- Reactions:
- Posts: 429
- Joined: Wed Apr 30, 2008 8:37 pm
- Bike owned: nc24
- Location: Newtownards Co.Down N.Ireland
Re: Valve Clearance Guide
Anyone have this info for an nc24 by any chance? Please!!!
\That wee smilie can drink some Guinness. No wonder he's yellow.
-
Malc
- Site Supporter
- Reactions:
- Posts: 222
- Joined: Tue Apr 08, 2008 5:01 pm
- Bike owned: NC35, 5SL, 3XV, 2MA
- Location: Sharpthorne
Re: Valve Clearance Guide
Nice useful info, but it would be better if the terminology inaccuracies were fixed. For example -
"... carefully help you separate the cylinder head from the block" should say
"... carefully help you separate the camshaft cover from the cylinder head"
"First of all remove the 4 bolts that holds the head in place" should say
"First of all remove the 4 bolts that holds the camshaft cover in place"
Sorry to be picky, but when I started to read it my first thought was "Why on earth is he removing cylinder heads!?"
PS - I find a gentle tap with a soft faced mallet is usually plenty to break the seal between cover and head - no need to lever it with a screwdriver
-
Lasse
- Settled in member
- Reactions:
- Posts: 161
- Joined: Thu May 22, 2008 12:03 am
- Location: Dublin
- Contact:
Re: Valve Clearance Guide
After removing the four bolts, gently place a screwdriver in one of the holes and twist lightly, loose.
-
viper_biker
- Moderators
- Reactions:
- Posts: 1798
- Joined: Sun Apr 06, 2008 11:25 am
- Bike owned: VFR400RR, CBR1000RR6
- Location: Belfast, Norn Iron
- Contact:
Re: Valve Clearance Guide
Everyones a critic LOL
When this was written I had just stripped and re-built a bike, did the valve clearances and added a washer to the needles and drilled the slides along with taking in the region of 100 pictures or so then proceeded to write this so my brain was in full function. Also, I did this about 2 years ago but I will go back over it and amend accordingly, thanks for your input.
When this was written I had just stripped and re-built a bike, did the valve clearances and added a washer to the needles and drilled the slides along with taking in the region of 100 pictures or so then proceeded to write this so my brain was in full function. Also, I did this about 2 years ago but I will go back over it and amend accordingly, thanks for your input.
Ducati 916, not worth a carrott
-
dix
- Settled in member
- Reactions:
- Posts: 52
- Joined: Sat Jun 21, 2008 7:02 pm
Re: Valve Clearance Guide
manythanks viper dood
-
Lasse
- Settled in member
- Reactions:
- Posts: 161
- Joined: Thu May 22, 2008 12:03 am
- Location: Dublin
- Contact:
Re: Valve Clearance Guide
Maybe edit the post to use the new picture feature?
-
Kevbarlas
- Settled in member
- Reactions:
- Posts: 4
- Joined: Tue Jul 29, 2008 10:51 pm
Re: Valve Clearance Guide
Thats a good write up you done.
What exactly does having wrong valve clearances do? like, will this make a noticeable difference?
What exactly does having wrong valve clearances do? like, will this make a noticeable difference?
-
Lasse
- Settled in member
- Reactions:
- Posts: 161
- Joined: Thu May 22, 2008 12:03 am
- Location: Dublin
- Contact:
Re: Valve Clearance Guide
If you are considering skipping checking the valve clearances, dont.Kevbarlas wrote:Thats a good write up you done.
What exactly does having wrong valve clearances do? like, will this make a noticeable difference?
Burnt valves, poor running, loud valve train, not good things I promise you.
-
monkeywithaplan

- Site Supporter
- Reactions:
- Posts: 236
- Joined: Wed Apr 30, 2008 4:45 pm
- Bike owned: NC35 and NC30
- Location: Belfast. Northern Ireland
Re: Valve Clearance Guide
agreed. think of it compared to wiping your arse with a thorny bush, or perhaps a cactus. it will only end in tearsLasse wrote:If you are considering skipping checking the valve clearances, dont.Kevbarlas wrote:Thats a good write up you done.
What exactly does having wrong valve clearances do? like, will this make a noticeable difference?
Burnt valves, poor running, loud valve train, not good things I promise you.
Insisting on perfect safety is for people who don't have the balls to live in the real world. Mary Shafer, NASA Ames Dryden
Bikes don't leak oil, they mark their territory.
Bikes don't leak oil, they mark their territory.