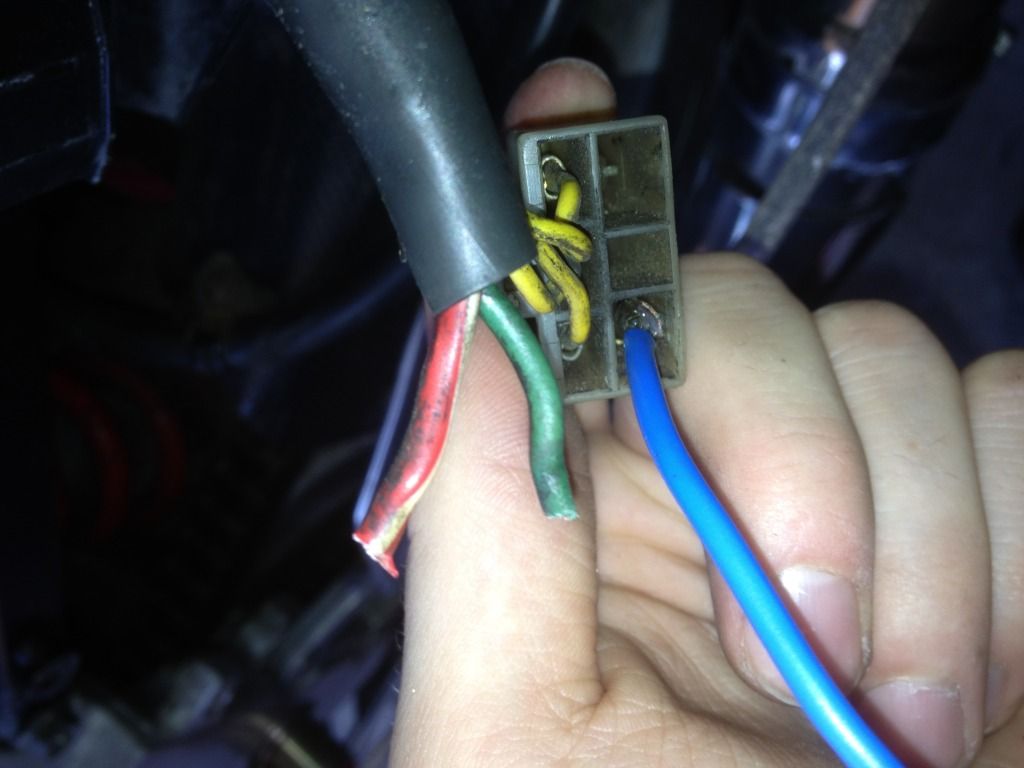
Yes this seems like a good option. But just to comfirm
3 x yellow
1 x red
1 x green
whats gets cut, spliced or what goes where??
Charging System Wiring Improvement
Forum rules
Please can you post items for sale or wanted in the correct For Sale section. Items / bikes for sale here will be removed without warning. Reasons for this are in the FAQ. Thanks
Please can you post items for sale or wanted in the correct For Sale section. Items / bikes for sale here will be removed without warning. Reasons for this are in the FAQ. Thanks
-
hannakournikova

- Site Supporter

- Posts: 769
- Joined: Wed Apr 30, 2008 6:46 pm
- Bike owned: NC30, NC35 & SP2
- Location: Belfast, Northern Ireland
-
porndoguk

- Site Supporter
- Posts: 3293
- Joined: Wed Jun 16, 2010 11:17 pm
- Bike owned: NC30
- Location: Middle England
- Contact:
Re: Charging System Wiring Improvement
Red to live or + of battery
Green to earth or - of battery
The 3 yellow are from the alternator (3phase AC)
Green to earth or - of battery
The 3 yellow are from the alternator (3phase AC)
NC30 & NC23 33BHP Restrictors For Sale
£25 Inc P&P and donation to 400GB PM for more details
http://www.bikerstraining.com
Like us on Facebook for more information - First Bike on Scene - Emergency Response Skills - UK
£25 Inc P&P and donation to 400GB PM for more details
http://www.bikerstraining.com
Like us on Facebook for more information - First Bike on Scene - Emergency Response Skills - UK
-
scotjell
- Regular Member
- Posts: 501
- Joined: Mon Aug 18, 2008 7:33 pm
- Bike owned: VFR400 NC30x2
- Location: Bristol
Re: Charging System Wiring Improvement
Only a suggestion but if this does what it says on the tin and simple enough to knock up perhaps supply a kit and have a guide on hear. Saves a lot of hassle with people asking will this work, what about this etc. Only a suggestion like we see what RO has done and produced a lot of useful parts and info.
-
porndoguk
- Site Supporter
- Posts: 3293
- Joined: Wed Jun 16, 2010 11:17 pm
- Bike owned: NC30
- Location: Middle England
- Contact:
Re: Charging System Wiring Improvement
Our dear member MAGG lives in NSW Australia! for the cost a few bits of wire and some crimps it would probally cost alot more to post,
scotjell, i can knock you some up as i owe you a favour for the carb bits, it really is a simple job,
youll have to wait a few weeks whilst i get my workshop together as ive just moved in
scotjell, i can knock you some up as i owe you a favour for the carb bits, it really is a simple job,
youll have to wait a few weeks whilst i get my workshop together as ive just moved in
NC30 & NC23 33BHP Restrictors For Sale
£25 Inc P&P and donation to 400GB PM for more details
http://www.bikerstraining.com
Like us on Facebook for more information - First Bike on Scene - Emergency Response Skills - UK
£25 Inc P&P and donation to 400GB PM for more details
http://www.bikerstraining.com
Like us on Facebook for more information - First Bike on Scene - Emergency Response Skills - UK
-
scotjell
- Regular Member
- Posts: 501
- Joined: Mon Aug 18, 2008 7:33 pm
- Bike owned: VFR400 NC30x2
- Location: Bristol
Re: Charging System Wiring Improvement
Hey that would be fab. My charging system don't look too kipper but works. I think the cables has got that short though reg rec failures it don't even bother going through the V to the right hand side connector. Oh well so will reduce the loss of volts hahaha.
-
magg
- Senior Member
- Posts: 1914
- Joined: Mon Sep 20, 2010 11:55 pm
- Bike owned: VFR400
- Location: Blue Mountain NSW Australia
Re: Charging System Wiring Improvement
The most important point for any rewiring of the rect/reg and battery is to make the lead between the -ve output terminal of the rect/reg and the -ve terminal of the battery as short as possible. A shorter +ve lead with few connections is a bonus.
As it I understand of layout of the original loom, there is only one chassis earth connection at the front of the bike. This means that the battery charging current has to flow through the full length of the loom to reach the chassis before traveling back through the chassis to the -ve battery lead.
As it I understand of layout of the original loom, there is only one chassis earth connection at the front of the bike. This means that the battery charging current has to flow through the full length of the loom to reach the chassis before traveling back through the chassis to the -ve battery lead.
-
bikemonkey

- NWAA Supporter

- Posts: 1521
- Joined: Tue Dec 27, 2011 12:33 pm
- Bike owned: 92 NC30, 90 VFR750
- Location: Oxfordshire
Re: Charging System Wiring Improvement
Just done this upgrade on my bike, patience was needed as me and fiddly electrics don't usually get on 
But it all went ok, even though I blew the main fuse shorting the two battery wires on the reg/rec (should have disconnected the battery first, did do it after that)
Bike was giving me these voltages across the battery BEFORE the upgrade: RUNNING= 13.8 (idle)
RUNNING= 14.1 (5k rpm)
I now get : RUNNING = 14.9 (idle)
RUNNING = 15.0 (5k rpm)
These results are with a lithium ion battery, and the upgrade wasn't exactly necessary but it has significantly improved the efficiency of the charging system.
As magg stated was best, the positive wire has an inline 30A fuse to protect the battery and the negative wire was made as short as possible.
I had to re-use the old spade terminals, which was tricky as they were both quite corroded near the wire end. So I ended up soldering them on as well as crimping them down just to make sure they didn't work loose.
I also had to extend the wiring on the inline fuse I bought as it was about 7cm too short, but I just used some spade connectors I had lying around.
Anyway enough rambling, piccies :


What I should have done to make things easier was leave the original spade connectors intact, but cut the wire from them back further and added new spade connectors on the end of each and connected the new wiring that way, then taped up the old ones.
But hey ho!
But it all went ok, even though I blew the main fuse shorting the two battery wires on the reg/rec
Bike was giving me these voltages across the battery BEFORE the upgrade: RUNNING= 13.8 (idle)
RUNNING= 14.1 (5k rpm)
I now get : RUNNING = 14.9 (idle)
RUNNING = 15.0 (5k rpm)
These results are with a lithium ion battery, and the upgrade wasn't exactly necessary but it has significantly improved the efficiency of the charging system.
As magg stated was best, the positive wire has an inline 30A fuse to protect the battery and the negative wire was made as short as possible.
I had to re-use the old spade terminals, which was tricky as they were both quite corroded near the wire end. So I ended up soldering them on as well as crimping them down just to make sure they didn't work loose.
I also had to extend the wiring on the inline fuse I bought as it was about 7cm too short, but I just used some spade connectors I had lying around.
Anyway enough rambling, piccies :
What I should have done to make things easier was leave the original spade connectors intact, but cut the wire from them back further and added new spade connectors on the end of each and connected the new wiring that way, then taped up the old ones.
But hey ho!
-
Morespeedvicar
- Site Supporter
- Posts: 837
- Joined: Thu May 01, 2008 1:37 am
- Bike owned: Fzr400, NC30, CB50J, SS50Z KLR
- Location: Grimsby
Re: Charging System Wiring Improvement
Why not leave the standard wire connected aswell, seeing as its already in there and your not gonna take it out?
Cheers
Ian
Cheers
Ian
-
bikemonkey
- NWAA Supporter
- Posts: 1521
- Joined: Tue Dec 27, 2011 12:33 pm
- Bike owned: 92 NC30, 90 VFR750
- Location: Oxfordshire
Re: Charging System Wiring Improvement
No idea.....
Someone else might say it's a bad idea, but I just did as magg has.
Someone else might say it's a bad idea, but I just did as magg has.
-
magg
- Senior Member
- Posts: 1914
- Joined: Mon Sep 20, 2010 11:55 pm
- Bike owned: VFR400
- Location: Blue Mountain NSW Australia
Re: Charging System Wiring Improvement
You can leave the original wires intact if you wish but as you would then need to splice into them I decided it was easier and perhaps more reliable to replace them
There are a number of ways to achieve the same result, mine might be considered over-kill.
There are a number of ways to achieve the same result, mine might be considered over-kill.