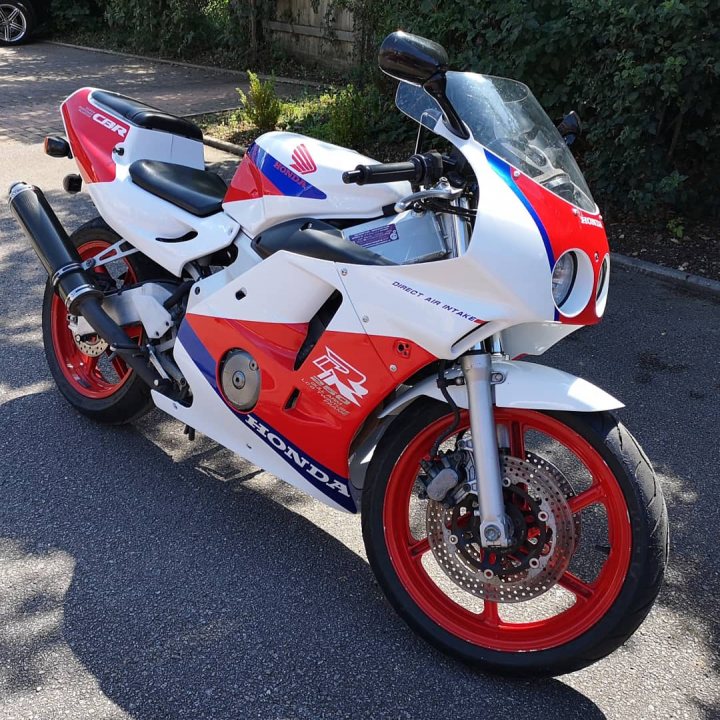
My original fairing was in OK condition, but had a few broken mounting points that would have required filling or gluing then sanding, repainting and all that grief. Given that I want to get the bike on the road before the end of the summer I decided to take a gamble on a Chinese made pattern set. In all it took about six weeks to confirm the order, have it made and painted, shipped and passed through customs. It was relatively cheap for a full set, £219 and £35 for customs. The guy I was emailing was quite helpful and responsive but because of the distance it took a day to get a response back. He was also quite accommodating around adding/removing graphics. Links at bottom


Does that look straight to you? It doesn't look straight to me. And the lettering is all a bit wibbly. This was the first disappointment and at this stage I was wondering what other horrors lay in store. I had to order that specifically as it didn't come as standard under the maker's misinterpretation of the original. That orange peel finish looks a lot worse in this picture than in the flesh.

Pretty crude link tabs and blobs of glue. The whole of the inside front fairing was later sprayed satin black as per the original which took a good hour of masking up.

I was pretty surprised and disappointed of the finish here. Either this part was sprayed resting on the floor or painted so thin and mishandled that it wore off. Shame really as the quality of paint was pretty high.

Original on left. So here we have my biggest disappointment. I can live with putting the effort in to de-burr lugs and edges, and having to file grooves or drill out holes. But there's a not a lot I can do about non-original colours. Don't get me wrong, the metallic blue is quite snazzy and I'm sure some will like it but it's not the original. And the logo is a much lighter blue which has less presence. To be fair to the makers, when I asked if the spec picture showed metallic paint, I was told that it comes exactly as shown in the pic. I assumed it was just strong lighting that made it look lighter and shinier. But he also could have confirmed that it was a metallic finish.

These are pretty poorly shaped and defined but ultimately worked out fine with a bit of drilling out and filing. Rivet holes would also be needed to mount the quarter-turn fasteners. The logos here and elsewhere are noticeably "blobbier" and less sharp than the originals.

Original on left. The tabs look about right but needed quite a bit of cutting and adjusting to make fit. You can also see how the graphics are different. What's not so clear is that the original darker colour is a kind of navy blue whereas the new part is jet black. If you know the colour scheme you'd notice this as easily as the metallic paint. And of course the holes for the quarter-turn fastners needed drilling out.

Very impressive paint colour and application. It's a nice finish but it's really delicate and scratches very easily. Maybe it hadn't fully cured or maybe it was poor quality paint. Either way it needed handling with care while at the same time handling scalpels, files and power tools.

Overall, pretty nicely done and good finish although even a brief look at the mating edges made it clear it was going to be a scrappy fit.

I didn't want this graphic and forgot to ask for it to be removed. It's been lacquered over so no going back now. Looks horrible close up, not so bad from a distance and reminded me of the quote by Giorgetto Giugiaro when, after looking at one side of the newly launched Triumph TR7, he viewed the other and exclaimed "My God! They've done it to the other side as well!".

Can you spot the difference? Oh boy, this led to a lot of fitting problems and well known gaps in the rear cowl.

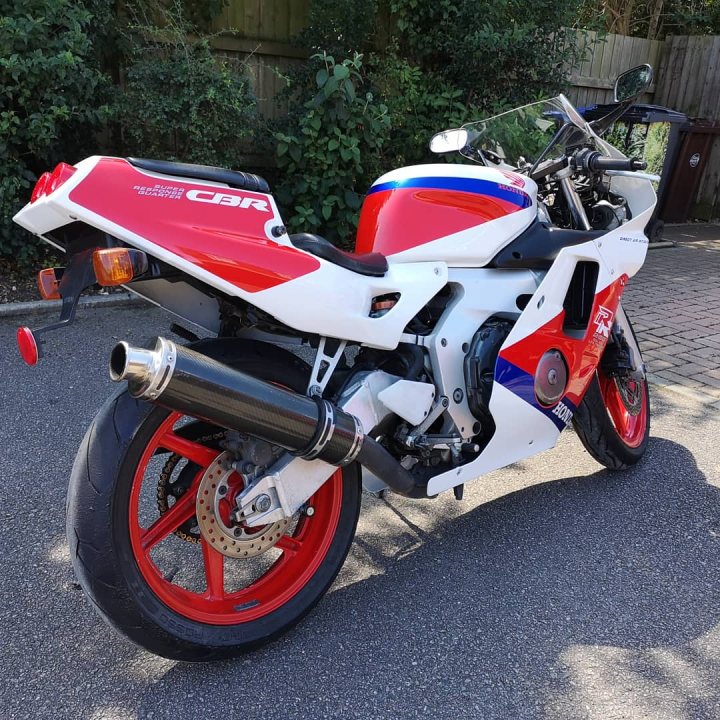
No fitted heat shielding but the maker did supply a good amount of self adhesive shielding which I backed up with some heat resistant foil tape.

Original on right. Notice how the edges of the original look sharp, straight and square and how the replacement part doesn't.

About all that the new part has going for it is that the paint looks better.

Mounting points look about right but there's no fitment for the top of the tail light.

Since the new panel didn't have a mounting point to accept the securing bolt this didn't strictly need repairing but as I plan to restore the original panels at some point I thought I'd give it a try. Plastic welding kit in the background.
This material is different to the bodywork. fortunately the welding kit comes with four different types of welding rod and the tail light has plenty of unseen surface to practice on.

Welded repair. Mole grips help.

Weld to the other side to add strength to the repair.

So after putting the seat panels and and rear cowl together this is what the fit looks like without any other work. I wasn't going to settle for that.

This side is worse. I think that hole is trying to be a square but even Big Ted would have trouble looking through that window.

So here's the plan. Very tightly tape up the panels to make them fit (when I say tight I mean really very tight). Then weld up the gaps from the inside. As this takes a lot of time and heat transfer there's a real risk of scorching the paintwork. Two tricks I used to prevent this was tape over folded kitchen paper under the duct tape, and then wet it, and back that up by resting the joins on a damp cloth.

Welded up.

It doesn't look pretty but it's pretty effective.

Tail light fitted. Went in fairly easily but only those two bolts are holding it in. You can see the top mounting point expecting to meet something on the cowl that isn't there. I tried high strength double sided tape, which didn't work. Next best idea was to used a rag stuffed up against the light assembly once in place on the bike.

Anyone know what these things are called?

Finished article in situ on the bike. I can't do much about the lack of squareness in the light recesses without making them worse.

Not too bad.

Right quarter panel. After a bit of cutting adjustment this is the best I could get it. I did consider another plastic weld effort but having a piece of bodywork that stretches from that far back, around the front and around the other side wouldn't make sense for a few reasons. I can't stress how much more sense it makes to do this patiently and comfortably with the panels off the bike indoors, than in a rush and crouching next to the bike.

Left quarter panel. Doesn't look too bad but it's annoying to someone like me.

Poor alignment here and not a lot I could do about it. The actual radiator cowl is the original item.

View from other side.

Seat to tank fitting. Much bigger gap than I remember the original.

This, like every fitting and fastner mount took trial and error filing and cutting to make fit. The gap above the lock was how it came without anything I cut away.

Finished
Overall, it took me about four two hour sessions to trim, file drill and weld the panels to fit with them off the bike, and then a little over the normal time to get the panels on. The holes in the seat for the six mounting bolts needed a bit of filing with a round file which you can only really do when it's on the bike.
I'm happy with the result despite the non-original colours and will last while I spend the winter repairing the OEM panels.
I should also say that the kit came with a mudguard, black screen radiator panel, and tank pad, none of which I used
Useful links
Supplier -
http://www.aliexpress.com/item/OEM-Fair ... 90130.html
Plastic weld kit recommended by RO -
http://www.ebay.co.uk/itm/BUMPER-REPAIR ... 19f55c9659


