Fairings from China/Hong Kong
Forum rules
Please can you post items for sale or wanted in the correct For Sale section. Items / bikes for sale here will be removed without warning. Reasons for this are in the FAQ. Thanks
Please can you post items for sale or wanted in the correct For Sale section. Items / bikes for sale here will be removed without warning. Reasons for this are in the FAQ. Thanks
-
Icemaestro
- Familiar Member
- Reactions:
- Posts: 499
- Joined: Wed Nov 27, 2013 6:45 am
Re: Fairings from China/Hong Kong
You can't expect oem quality for that price, it has been previously written about extensively the above issues, so they shouldn't be a surprise?? I think if I dremel out the side mount hole a little it'll bring it a bit closer together but not sure :-)
Sent from my iPhone using Tapatalk
Sent from my iPhone using Tapatalk
-
Swingarm
- NWAA Supporter

- Reactions:
- Posts: 99
- Joined: Sun Jan 18, 2015 2:23 pm
- Bike owned: AR 125, NC30
Re: Fairings from China/Hong Kong
My original fairing was in OK condition, but had a few broken mounting points that would have required filling or gluing then sanding, repainting and all that grief. Given that I want to get the bike on the road before the end of the summer I decided to take a gamble on a Chinese made pattern set. In all it took about six weeks to confirm the order, have it made and painted, shipped and passed through customs. It was relatively cheap for a full set, £219 and £35 for customs. The guy I was emailing was quite helpful and responsive but because of the distance it took a day to get a response back. He was also quite accommodating around adding/removing graphics. Links at bottom


Does that look straight to you? It doesn't look straight to me. And the lettering is all a bit wibbly. This was the first disappointment and at this stage I was wondering what other horrors lay in store. I had to order that specifically as it didn't come as standard under the maker's misinterpretation of the original. That orange peel finish looks a lot worse in this picture than in the flesh.

Pretty crude link tabs and blobs of glue. The whole of the inside front fairing was later sprayed satin black as per the original which took a good hour of masking up.

I was pretty surprised and disappointed of the finish here. Either this part was sprayed resting on the floor or painted so thin and mishandled that it wore off. Shame really as the quality of paint was pretty high.

Original on left. So here we have my biggest disappointment. I can live with putting the effort in to de-burr lugs and edges, and having to file grooves or drill out holes. But there's a not a lot I can do about non-original colours. Don't get me wrong, the metallic blue is quite snazzy and I'm sure some will like it but it's not the original. And the logo is a much lighter blue which has less presence. To be fair to the makers, when I asked if the spec picture showed metallic paint, I was told that it comes exactly as shown in the pic. I assumed it was just strong lighting that made it look lighter and shinier. But he also could have confirmed that it was a metallic finish.

These are pretty poorly shaped and defined but ultimately worked out fine with a bit of drilling out and filing. Rivet holes would also be needed to mount the quarter-turn fasteners. The logos here and elsewhere are noticeably "blobbier" and less sharp than the originals.

Original on left. The tabs look about right but needed quite a bit of cutting and adjusting to make fit. You can also see how the graphics are different. What's not so clear is that the original darker colour is a kind of navy blue whereas the new part is jet black. If you know the colour scheme you'd notice this as easily as the metallic paint. And of course the holes for the quarter-turn fastners needed drilling out.

Very impressive paint colour and application. It's a nice finish but it's really delicate and scratches very easily. Maybe it hadn't fully cured or maybe it was poor quality paint. Either way it needed handling with care while at the same time handling scalpels, files and power tools.

Overall, pretty nicely done and good finish although even a brief look at the mating edges made it clear it was going to be a scrappy fit.

I didn't want this graphic and forgot to ask for it to be removed. It's been lacquered over so no going back now. Looks horrible close up, not so bad from a distance and reminded me of the quote by Giorgetto Giugiaro when, after looking at one side of the newly launched Triumph TR7, he viewed the other and exclaimed "My God! They've done it to the other side as well!".

Can you spot the difference? Oh boy, this led to a lot of fitting problems and well known gaps in the rear cowl.

No fitted heat shielding but the maker did supply a good amount of self adhesive shielding which I backed up with some heat resistant foil tape.

Original on right. Notice how the edges of the original look sharp, straight and square and how the replacement part doesn't.

About all that the new part has going for it is that the paint looks better.

Mounting points look about right but there's no fitment for the top of the tail light.

Since the new panel didn't have a mounting point to accept the securing bolt this didn't strictly need repairing but as I plan to restore the original panels at some point I thought I'd give it a try. Plastic welding kit in the background.
This material is different to the bodywork. fortunately the welding kit comes with four different types of welding rod and the tail light has plenty of unseen surface to practice on.

Welded repair. Mole grips help.

Weld to the other side to add strength to the repair.

So after putting the seat panels and and rear cowl together this is what the fit looks like without any other work. I wasn't going to settle for that.

This side is worse. I think that hole is trying to be a square but even Big Ted would have trouble looking through that window.

So here's the plan. Very tightly tape up the panels to make them fit (when I say tight I mean really very tight). Then weld up the gaps from the inside. As this takes a lot of time and heat transfer there's a real risk of scorching the paintwork. Two tricks I used to prevent this was tape over folded kitchen paper under the duct tape, and then wet it, and back that up by resting the joins on a damp cloth.

Welded up.

It doesn't look pretty but it's pretty effective.

Tail light fitted. Went in fairly easily but only those two bolts are holding it in. You can see the top mounting point expecting to meet something on the cowl that isn't there. I tried high strength double sided tape, which didn't work. Next best idea was to used a rag stuffed up against the light assembly once in place on the bike.

Anyone know what these things are called?

Finished article in situ on the bike. I can't do much about the lack of squareness in the light recesses without making them worse.

Not too bad.

Right quarter panel. After a bit of cutting adjustment this is the best I could get it. I did consider another plastic weld effort but having a piece of bodywork that stretches from that far back, around the front and around the other side wouldn't make sense for a few reasons. I can't stress how much more sense it makes to do this patiently and comfortably with the panels off the bike indoors, than in a rush and crouching next to the bike.

Left quarter panel. Doesn't look too bad but it's annoying to someone like me.

Poor alignment here and not a lot I could do about it. The actual radiator cowl is the original item.

View from other side.

Seat to tank fitting. Much bigger gap than I remember the original.

This, like every fitting and fastner mount took trial and error filing and cutting to make fit. The gap above the lock was how it came without anything I cut away.

Finished
Overall, it took me about four two hour sessions to trim, file drill and weld the panels to fit with them off the bike, and then a little over the normal time to get the panels on. The holes in the seat for the six mounting bolts needed a bit of filing with a round file which you can only really do when it's on the bike.
I'm happy with the result despite the non-original colours and will last while I spend the winter repairing the OEM panels.
I should also say that the kit came with a mudguard, black screen radiator panel, and tank pad, none of which I used
Useful links
Supplier - http://www.aliexpress.com/item/OEM-Fair ... 90130.html
Plastic weld kit recommended by RO - http://www.ebay.co.uk/itm/BUMPER-REPAIR ... 19f55c9659
Does that look straight to you? It doesn't look straight to me. And the lettering is all a bit wibbly. This was the first disappointment and at this stage I was wondering what other horrors lay in store. I had to order that specifically as it didn't come as standard under the maker's misinterpretation of the original. That orange peel finish looks a lot worse in this picture than in the flesh.
Pretty crude link tabs and blobs of glue. The whole of the inside front fairing was later sprayed satin black as per the original which took a good hour of masking up.
I was pretty surprised and disappointed of the finish here. Either this part was sprayed resting on the floor or painted so thin and mishandled that it wore off. Shame really as the quality of paint was pretty high.
Original on left. So here we have my biggest disappointment. I can live with putting the effort in to de-burr lugs and edges, and having to file grooves or drill out holes. But there's a not a lot I can do about non-original colours. Don't get me wrong, the metallic blue is quite snazzy and I'm sure some will like it but it's not the original. And the logo is a much lighter blue which has less presence. To be fair to the makers, when I asked if the spec picture showed metallic paint, I was told that it comes exactly as shown in the pic. I assumed it was just strong lighting that made it look lighter and shinier. But he also could have confirmed that it was a metallic finish.
These are pretty poorly shaped and defined but ultimately worked out fine with a bit of drilling out and filing. Rivet holes would also be needed to mount the quarter-turn fasteners. The logos here and elsewhere are noticeably "blobbier" and less sharp than the originals.
Original on left. The tabs look about right but needed quite a bit of cutting and adjusting to make fit. You can also see how the graphics are different. What's not so clear is that the original darker colour is a kind of navy blue whereas the new part is jet black. If you know the colour scheme you'd notice this as easily as the metallic paint. And of course the holes for the quarter-turn fastners needed drilling out.
Very impressive paint colour and application. It's a nice finish but it's really delicate and scratches very easily. Maybe it hadn't fully cured or maybe it was poor quality paint. Either way it needed handling with care while at the same time handling scalpels, files and power tools.
Overall, pretty nicely done and good finish although even a brief look at the mating edges made it clear it was going to be a scrappy fit.
I didn't want this graphic and forgot to ask for it to be removed. It's been lacquered over so no going back now. Looks horrible close up, not so bad from a distance and reminded me of the quote by Giorgetto Giugiaro when, after looking at one side of the newly launched Triumph TR7, he viewed the other and exclaimed "My God! They've done it to the other side as well!".
Can you spot the difference? Oh boy, this led to a lot of fitting problems and well known gaps in the rear cowl.
No fitted heat shielding but the maker did supply a good amount of self adhesive shielding which I backed up with some heat resistant foil tape.
Original on right. Notice how the edges of the original look sharp, straight and square and how the replacement part doesn't.
About all that the new part has going for it is that the paint looks better.
Mounting points look about right but there's no fitment for the top of the tail light.
Since the new panel didn't have a mounting point to accept the securing bolt this didn't strictly need repairing but as I plan to restore the original panels at some point I thought I'd give it a try. Plastic welding kit in the background.
This material is different to the bodywork. fortunately the welding kit comes with four different types of welding rod and the tail light has plenty of unseen surface to practice on.
Welded repair. Mole grips help.
Weld to the other side to add strength to the repair.
So after putting the seat panels and and rear cowl together this is what the fit looks like without any other work. I wasn't going to settle for that.
This side is worse. I think that hole is trying to be a square but even Big Ted would have trouble looking through that window.
So here's the plan. Very tightly tape up the panels to make them fit (when I say tight I mean really very tight). Then weld up the gaps from the inside. As this takes a lot of time and heat transfer there's a real risk of scorching the paintwork. Two tricks I used to prevent this was tape over folded kitchen paper under the duct tape, and then wet it, and back that up by resting the joins on a damp cloth.
Welded up.
It doesn't look pretty but it's pretty effective.
Tail light fitted. Went in fairly easily but only those two bolts are holding it in. You can see the top mounting point expecting to meet something on the cowl that isn't there. I tried high strength double sided tape, which didn't work. Next best idea was to used a rag stuffed up against the light assembly once in place on the bike.
Anyone know what these things are called?
Finished article in situ on the bike. I can't do much about the lack of squareness in the light recesses without making them worse.
Not too bad.
Right quarter panel. After a bit of cutting adjustment this is the best I could get it. I did consider another plastic weld effort but having a piece of bodywork that stretches from that far back, around the front and around the other side wouldn't make sense for a few reasons. I can't stress how much more sense it makes to do this patiently and comfortably with the panels off the bike indoors, than in a rush and crouching next to the bike.
Left quarter panel. Doesn't look too bad but it's annoying to someone like me.
Poor alignment here and not a lot I could do about it. The actual radiator cowl is the original item.
View from other side.
Seat to tank fitting. Much bigger gap than I remember the original.
This, like every fitting and fastner mount took trial and error filing and cutting to make fit. The gap above the lock was how it came without anything I cut away.
Finished
Overall, it took me about four two hour sessions to trim, file drill and weld the panels to fit with them off the bike, and then a little over the normal time to get the panels on. The holes in the seat for the six mounting bolts needed a bit of filing with a round file which you can only really do when it's on the bike.
I'm happy with the result despite the non-original colours and will last while I spend the winter repairing the OEM panels.
I should also say that the kit came with a mudguard, black screen radiator panel, and tank pad, none of which I used
Useful links
Supplier - http://www.aliexpress.com/item/OEM-Fair ... 90130.html
Plastic weld kit recommended by RO - http://www.ebay.co.uk/itm/BUMPER-REPAIR ... 19f55c9659
-
decngb
- Settled in member
- Reactions:
- Posts: 47
- Joined: Mon Oct 16, 2017 3:58 pm
- Bike owned: NC21, NC24, NC30, VFR800, MC19
- Location: Georgia, USA
Re: Fairings from China/Hong Kong
This thread has been too quiet! I ordered a set of Chinese fairings in a different paint scheme that the Chinese fairing that came with my bike. Therefore, the paint lines on my tank aren't correct for the set I now have. I also haven't swapped the front fender as I'm waiting until I get a proper front stand to remove the front wheel.
I've never done this kind of work before, but with some trimming, some extra PVC and PVC glue, I think it came out looking pretty good. I did glue the tail section pieces together off the bike. That is where most of the defects of the Chinese work show up. The front fairing pieces were a terrible fit together, but with some extra tabs glued on, plus the "ramps" and zip ties I added, the gap closes up quite well.
I didn't think it would ever be possible to close the gap between the rear side fairings near the rear seat lock. With the seats removed (and the parts off the bike), I did a little triming on the mating surfaces below the lock. All 3 rear pieces were assembled off the bike and taped together with painting tape. I glued the pieces together with some scrap PVC, trimmed the lock hole out, and then was shocked I could actually get the seat to fit
The only other Chinese factory defect worth mentioning is their complete inability to match the paint lines from one piece to the next. It's not worth the cost to correct that issue. Long term, I'll be interested in getting a set of damaged OEM fairings and learning plastic repair techniques. Then I can worry about a proper paint job.
-
dorkshoei
- Settled in member
- Reactions:
- Posts: 37
- Joined: Tue Jan 15, 2019 12:07 am
- Location: Portland, Oregon, USA
Re: Fairings from China/Hong Kong
Anyone have any tips on determining from pictures alone if an RVF400 has OEM or Chinese fairings?
It's easy to spot Tyga vs OEM as Tyga has fewer panels ("2 for the fairing instead of 6 and 1 for the seat cowling instead of 3").
There have been a lot of 1994 bikes at the Japanese auctions lately which have the 96-98 RT bodywork which is curious.
This one caught my eye, 1994 model year with 1996-1998 RT bodywork which lacks the "V4 Force" logos and AFAIK they're under the clearcoat on OEM so hard to remove.
-
ArizonaRVF
- Settled in member
- Reactions:
- Posts: 33
- Joined: Sat Jan 26, 2019 1:09 pm
- Bike owned: 1994 RVF400R
- Location: Desert Southwest USA
Re: Fairings from China/Hong Kong
FWIW, on my OEM '94 fairings, there is no clear coat, the graphics are laid straight on the plastic. With the repray I have going currently, I am having everything clear coated. You are better off fixing damaged OEM fairings than wasting your money on alternatives from Asia. Consider it an investment. I did go single seat cowl from Tyga, as I like the look better, but didn't go with the pre-painted version and had it sprayed instead.
You can tell by those pictures that they aren't OEM, as the Honda logo isn't in the correct position on the cowl. Another quick way to tell is by the hideous inner cowl on the non OEM garbage...they don't even take the time to remove the drill slag after drilling the holes in it.


You can tell by those pictures that they aren't OEM, as the Honda logo isn't in the correct position on the cowl. Another quick way to tell is by the hideous inner cowl on the non OEM garbage...they don't even take the time to remove the drill slag after drilling the holes in it.
-
dorkshoei
- Settled in member
- Reactions:
- Posts: 37
- Joined: Tue Jan 15, 2019 12:07 am
- Location: Portland, Oregon, USA
Re: Fairings from China/Hong Kong
This would match my old 1994 CBR600 which makes sense. I'd assumed the RVF used stickers as I thought I'd seen them on the parts fiche but I could be wrong.ArizonaRVF wrote: ↑Wed Apr 24, 2019 5:40 amFWIW, on my OEM '94 fairings, there is no clear coat, the graphics are laid straight on the plastic.
So can anyone explain the missing "V4 Force" logos on the pictures I linked to in my previous post? The fitment and lettering placement looks pretty good.
I have my own HVLP paint setup and spray booth so a repaint is no problem (like any good person living in the US, I have way too many "guns" :-). My ideal would be a bike that's been mono-color repainted though having access to a set of OEM, even in bad shape, is nice to figure out decal or fine-line placement.You are better off fixing damaged OEM fairings than wasting your money on alternatives from Asia.
What I don't want to do, is pay top $$$ for a bike that was made to look good via crappy Chinese fairings. This isn't a dig at ArizonaRVF's situation, rather that I see a lot of 94s rolling through the Japanese auctions with what looks like new or newish RT bodywork.
-
ArizonaRVF
- Settled in member
- Reactions:
- Posts: 33
- Joined: Sat Jan 26, 2019 1:09 pm
- Bike owned: 1994 RVF400R
- Location: Desert Southwest USA
Re: Fairings from China/Hong Kong
No worries. I believe explaining and documenting negative personal experiences is helpful to the community. My situation wasn't one that couldn't be rectified, as I had the OEM fairings, just not mounted on the bike. The aftermarket fairings that came on the bike will end up in the recycling bin at the landfill.
Having spoken with a very reputable seller concerning all aftermarket bodywork, they were very honest about it. What they said was this: "nothing fits like OEM". I found their honesty to be most refreshing.
Having spoken with a very reputable seller concerning all aftermarket bodywork, they were very honest about it. What they said was this: "nothing fits like OEM". I found their honesty to be most refreshing.
-
aceofhearts
- Settled in member
- Reactions:
- Posts: 33
- Joined: Sat Dec 29, 2012 3:39 am
Re: Fairings from China/Hong Kong
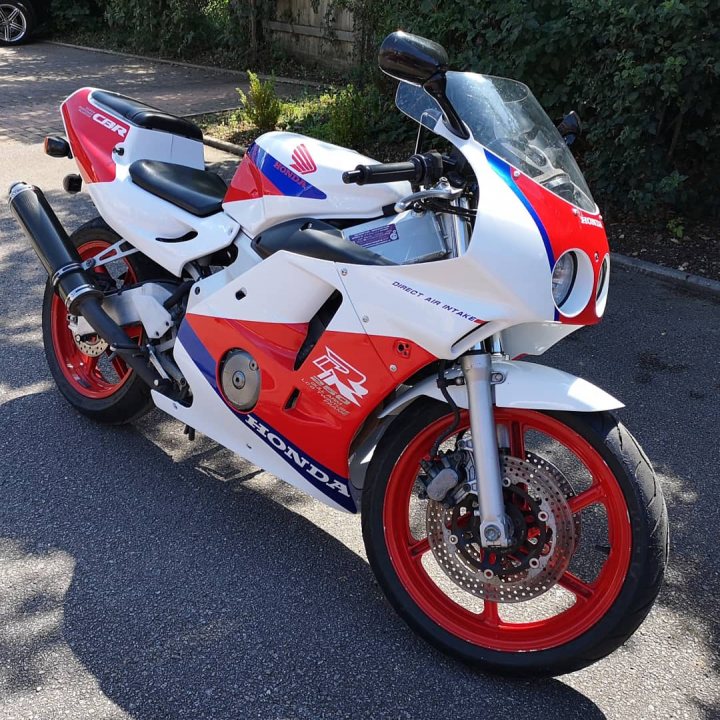
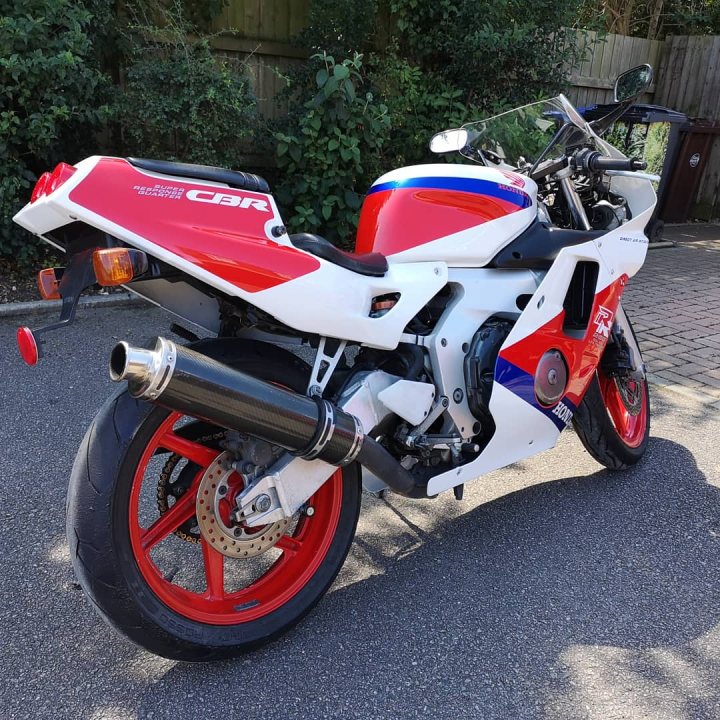
I have some Chinese fairings on my CBR250RR, in general they are ok and fit well, but the paint is a little thin in places and the edges can look a little rough. Generally pleased for the money though as a set of factory panels + paint would have cost thousands.
<a href="https://thumbsnap.com/ZKHzb7sG" title="Image Hosted by ThumbSnap"><img src="https://thumbsnap.com/s/ZKHzb7sG.jpg" alt="Free Photo Sharing by ThumbSnap" /></a>
<a href="https://thumbsnap.com/elw3kW93" title="Image Hosted by ThumbSnap"><img src="https://thumbsnap.com/s/elw3kW93.jpg" alt="Free Photo Sharing by ThumbSnap" /></a>
-
Foxy400
- Regular Member
- Reactions:
- Posts: 795
- Joined: Mon Sep 02, 2013 7:31 pm
- Bike owned: NC35 NC29 Bonneville CBR600F4i
- Location: Cheshire
Re: Fairings from China/Hong Kong
That looks pretty good to me, although they often do in photos as opposed to in the flesh. But if you're happy with it then that's the main thing.aceofhearts wrote: ↑Tue Mar 03, 2020 12:28 amI have some Chinese fairings on my CBR250RR, in general they are ok and fit well, but the paint is a little thin in places and the edges can look a little rough. Generally pleased for the money though as a set of factory panels + paint would have cost thousands.
<a href="https://thumbsnap.com/ZKHzb7sG" title="Image Hosted by ThumbSnap"><img src="https://thumbsnap.com/s/ZKHzb7sG.jpg" alt="Free Photo Sharing by ThumbSnap" /></a>
<a href="https://thumbsnap.com/elw3kW93" title="Image Hosted by ThumbSnap"><img src="https://thumbsnap.com/s/elw3kW93.jpg" alt="Free Photo Sharing by ThumbSnap" /></a>
Over the years I've bought OEM panels for my NC35 that have minor damage. I've had each one professionally repaired and painted as and when I could afford it. Only one more to go and that's a tail section. It's has no damage whatsoever and I got it on eBay for £15!!! It was advertised as an NC30 panel. It's been sprayed yellow so will need repainting Ross White and the stickers applying, for which I've been quoted £100. So £115 for an immaculate panel. They're out there if you're patient enough.
-
DougB123
- One Hit Wonder
- Reactions:
- Posts: 1
- Joined: Tue Feb 22, 2022 4:35 pm
Re: Fairings from China/Hong Kong
Just an update here - I have stock fairings on my '89 NC30 but want to remove them for some resto and repair on the connectors. In the meantime, I ordered a set of Chinese fairings from eBay seller NT-Fairings, which ship from California (and arrived quickly). Some observations:
- Why oh why do they insist on sending a windscreen in black?? I didn't need one, but who wants a black windscreen??
- The connection between the main front piece and the middle sides has been improved over other photos in this thread. The front piece now have the big clip-like retainers that the stock cowl has.
- I need to find a photo of how the ride seat attaches...I know the seat connects to the fairing sides via the studs molded into the seat, and then does that just rest on the rear subframe rails? Nothing else to attach it?
- Still no tab for holding the seat lock, or internal attachments for the taillight housing.
- The line from the front cowl to the middle sides seems to have been improved...no longer is there a "step" from one piece to the next.
- The front lower piece still just has holes drilled for ventilation, which seems inadequate. I routed out the whole area and backed it with a steel mesh. Looks good and should provide as much airflow as the stock piece.
More to come as I install this set!